/-/S'pht-Translator-Active/-/
|
|
/-/S'pht-Translator-Active/-/ |
| Tour of Duty - Click | ||
| Posted By: PerseusSpartacus | Date: 7/31/17 5:12 p.m. | |
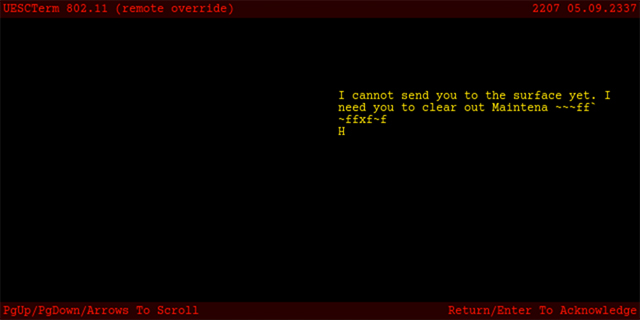
 Yeah... so this took longer than it should have – like, way longer. My apologies – I basically got sidetracked on a dozen other things for the last two to three weeks. I meant to write this up and get it posted Friday before last, but never got around to it. So, here I am, back for my first Tour of Duty since my "guest" contribution for By Committee back in August 2014 (been a while, I'd say). Last time on the Tour of Duty, Martin led us through a recreation level, crushed a Juggernaut with a pool's child/adult isolation mechanism, and hunted down Drones in a water maze. Isn't our new world fun? Kind of reminds me of our old world, the one where we were able to literally punch holes in alien soldiers with our super-human stre-- wait a minute, that sounds the same as this world... But that's besides the point. In the final terminal of the last mission, Merlin tried to tell us where he was sending us, but was interrupted by a sharp burst of static, and then told us he still lacked full control over his systems. Not a lot of information to go on starting this mission, but maybe we'll learn more after the loading screen is finished? When we beam in, we find ourselves in a fairly large, pretty rusty and very dark room. We must be in the Sewage texture set, which is unfortunate, because that is my least favorite texture set (especially in M2) and it tends to be associated with some mildly annoying levels – this map is no exception. The overall mood of this level is very dark, with little light, lots of rust, and a number of tight areas with little room to maneuver. Near the back wall where we start are two Magnum clips (yoink!), which may or may not be useful on this particular level (though they would certainly come in handy if you were scratch-starting, something I dare not try on this level). On the opposite wall is a terminal between two doors. It would be foolish to go anywhere without first trying to get some intel, so we naturally open the terminal:
So maybe this wasn't where we were supposed to go. Merlin is definitely starting to worry about the integrity of his systems, his sensors are going funky, and we don't have a lot to go on other than "hit any switches you find." But we would have done that anyway, right? Now to try out those doors. The one on the right leads to... nothing. It won't open, yet. Opening the one on the left, we're in for a bit of a shock, as directly behind it is a whole group of Fighters and, worst of all, flame Ticks. If you've never encountered these before, they're just like regular Ticks, but when they die, they burst into flame, making a fairly dangerous explosion, and they will actively try to kamikaze on you. Fortunately, if you keep your distance, you can shoot the one directly in front of you, and he'll likely set off a chain reaction, blowing up all the other Ticks and most, if not all, of the Fighters. Just beyond the door is the first of the long series of switches we need to hit. If you toggle it now, and then return to the first room, you'll find that the right door has now opened, to reveal another door directly behind it. Basically, the goal of this map is to find all ten switches and hit them, opening a series of ten doors that will allow us to come back here and enter the final room. Going back through the left door, we find another, somewhat brighter room, with a central pedestal and some [?spokes?platforms] coming out from said pedestal. On this pedestal is an Assault Rifle (again, not particularly helpful to us, but great if you're scratch-starting), and on each spoke, there's an AR Magazine – much needed ammo. To the left of the pedestal is a 1x Recharger, and on the far wall, there's a clip of AR Grenades. Also on the far side is the entrance to a long staircase. A purple Fighter is standing at the top of it, but he's facing the wrong way, and doesn't seem to have heard the commotion with the Ticks earlier – how inattentive! A few pistol rounds and some careful punching takes care of him, though it's worth noting that this map has very few places where the Fists come in handy – the tight spaces and the presence of these stairs make the footwork very difficult. Let's have a gander at the map before we go on:
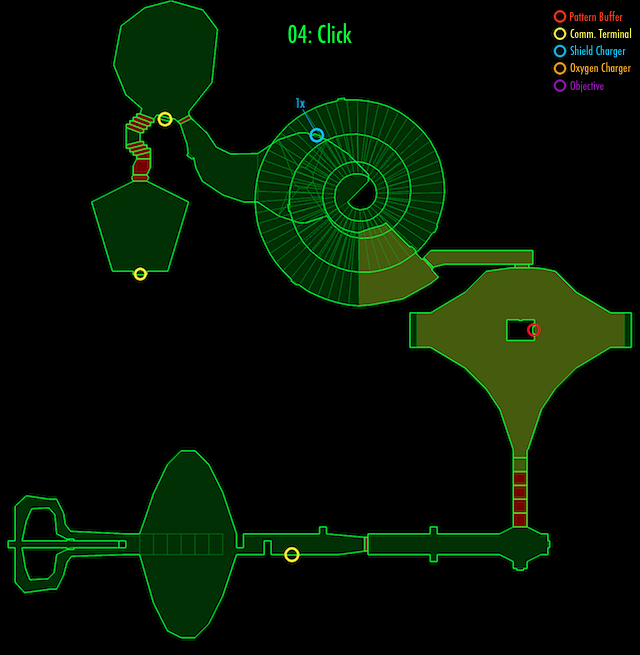
The starting room is in the top left, and as we can see, the room we are in lets us onto a sort of Nautilus shell-shaped spiral staircase. On this staircase are four of the switches we need to hit (nice), and a large number of enemies (not so nice). Amongst this pile of Pfhor-- I mean, "pirates", are three Hunters and about six Troopers. The Hunters are slightly troublesome given that we don't have a Fusion Pistol yet, but the Troopers are the real threat here, as they will continue to be throughout this level. The fact that we're fighting on a staircase makes maneuvering difficult (it's very hard to maintain traction with the floor in this game when that floor keeps dropping away). It's interesting to note that we're introduced to Troopers and Hunters after Juggernauts in this scenario. Very unusual, I'd say, but at least the Juggernaut had a simple weakness – these guys just have to be gunned down with an Assault Rifle, unless you found the secret Shotguns on the last level, but those don't have much ammo, so it's better to save those until some of the later, more close-quarters parts of this map. After slogging through this mass of enemies and hitting all four of the switches on the way, we reach the bottom, only to find a drop-off into a small pool of sewage. If we go down there, there's no way back out, but there's another switch and a door – since there's nowhere else to go, we'll have to drop down and trudge through the slimy muck. Better hope we brought waders, because this is gonna get messy! The sewage is at least waist-deep, and the lights are rather dark – overall, the atmosphere here is very bleak. Going through the door and down a narrow hallway, we come to another door on the right. Opening it, we come to a very dark room, with a central pillar and two alcoves on either side. On the front of the pillar is a switch, though not of the type that we were hitting earlier. If we move forward to toggle it, we're greeted by the murmurs of "pirates" on either side of us – it's a Trooper ambush! Hitting the switch turns on some lights in the room, making it a bit easier to see them coming for us. The waist-deep sewage makes it somewhat perilous to use grenades, which, if fired too low, can detonate in the sewage directly in front of you. This makes this ambush something of a challenge. If you have the Shotguns from before, you could use them now to take the Troopers on directly. However, shells are precious, and it's easier to just retreat back behind the door you came in from – the Troopers can't open it, so you can hide behind, opening it when you want to either let a Trooper come to you so you can gun him down, or pop out from behind cover and let a Grenade loose. After a brief while, the ambush is dispatched, and we can now move into the room safely. On the left side (from our perspective as we enter the room) of the pillar has a Pattern Buffer on it, the first and only one on this level. This is actually quite critical, because there is no way to recharge your shield from here until you can return to the original room with the 1x charger – better save now, so as to make sure we don't pay too heavy a price for any unfortunate accidents! There's nothing else in the alcoves, but there is some much-needed ammo – a pistol clip, two AR magazines and two grenade clips – along the northwest wall. What's even more frustrating, believe it or not, is that there's a Shotgun up on a high ledge in the east alcove, but as far as I can tell, it's unreachable, because the ledge is roughly two world units above the floor of the room we're in. There are no teleporters that lead to this ledge, and the only way I even know that it's there is because I happened to spot it in the map-maker. Maybe you could grenade jump up there to get it? That would require you have taken very little or no damage in the preceding battle, and it would be very little reward anyways, as there's only one Shotgun and no ammo for it – in fact, if you already got the two secret Shotguns on the last level, there's no reward here at all. Might as well move along, then. Heading to the south end of the large, sewage-filled room we're in, we see a long corridor that ends in a wall below a door way up high. That doesn't seem right, so we move closer to inspect this corridor – when you get close enough, the floor raises up to form a staircase up to that high door. Yay, we're getting out of the sewage! At the top of the staircase is a small room with two of the switches we're supposed to hit. Up ahead is a hallway leading to another door. If you're feeling like there's something suspicious about this hall, you should. As you approach the end, enemies teleport in all around you – specifically, one Major Trooper in front of you, and two Minor Troopers and two Fighters behind you. This is probably the most dangerous part of the mission, thus the reason they gave us that Pattern Buffer a minute ago. With just an Assault Rifle, this part is particularly difficult, as you have to quickly gun down the enemies behind you to get away from the Major Trooper, who is the main threat here. With Shotguns, however, this is a bit easier, and we can retreat back the way we came to get behind a corner where the Trooper can't shoot us. Popping out from behind cover, we can shoot at him as he tries to march down the hall towards us. With those nasties despatched, we can go through the door ahead. This leads to another hallway, with an indented light containing an AR magazine on our right, and a terminal on our left. Let's read:
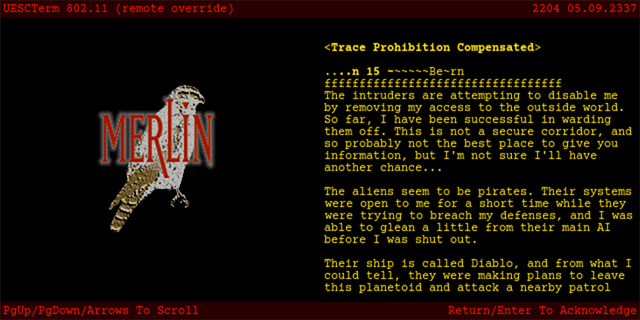
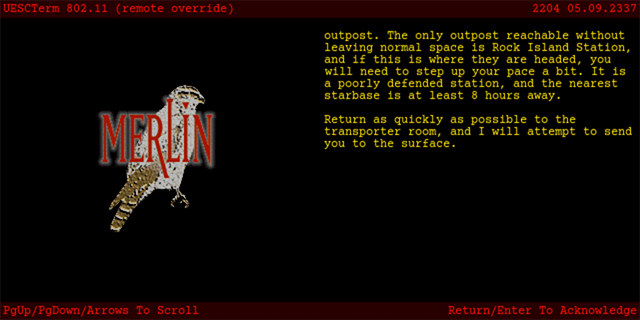
This terminal actually reminds me of the terminal way back on Defend THIS! in which Leela explained her initial findings about the Pfhor and the different types of enemy we had yet to encounter. So we now have a future objective in sight: saving Rock Island Station. I'm a little puzzled by the reference to "normal space" – any ideas what he might be referring to there? Merlin tells us to return to the transporter room so we can make our way to the surface. There's still a ways for us to go yet before we can get there, though. Directly ahead and on the right is a small, open door with a green light at the top, which leads to another tiny room with an identical passageway on the far left. This little bit of architecture reminds me of the early parts of Colony Ship for Sale, Cheap, with the awkward, dark passageways filled with Lookers waiting to explode under our feet. Interestingly enough, the room just past this contains the M2 equivalent of Lookers – namely, more Kamikaze Ticks! The map editor actually calls them "Tick Kamakazi", which is a very odd spelling (or mis-spelling) indeed, but whatever. There is a central stairway here, with two dark areas on either side. Two Troopers sit at the top of the stairs, and a whole host of Ticks wait on either side of the stairs. Fortunately, the Troopers will actually shoot at the Ticks, so we just have to sit back and kill only one or two Ticks that actually come after us. After that, it's fairly easy to mop up the Troopers. And what a mess those Ticks leave – corpses everywhere! There's nothing of interest in this dark room besides the stairs, which lead to a drop-off. Again, with nowhere else to go, we take the plunge, only this time there's no sewage at the bottom. Unfortunately, there's a fork here, with two narrow passageways leading left and right, both rather dark. Some of the Ticks from earlier actually came from these corridors, but we didn't see them come out, so you'd only know this by looking in the map editor. Whichever way we go, after coming to a corner, we hear enemies teleporting in up ahead. Specifically, two Major Fighters, two Minor Projectile Fighters, and four Minor Troopers. Again, Shotguns might help a bit, but we don't have much ammo yet, so it might be wiser to just hose down the "pirates" with our trusty Assault Rifle – after all, in these close quarters, most of the bullets are bound to hit, so why not capitalize on the improved efficiency? It turns out those two pathways both curve around to the same place. On one side of where they meet is a small alcove, and on the other side is a hallway. Inside this hallway are the last two switches we need to hit. This may appear to be a dead-end, but if you step into the alcove on the other side, you'll be teleported back to the room where we found the first switch and the 1x Shield Recharger – thank goodness, we could probably use a recharge right about now! Funnily enough, if you had stepped into the teleporter before hitting those last two switches, you would've had to go all the way back through the level just to get to them again – there'd be no enemies to deal with, but still, who wants to go through that sludge again? Once that's done, we can head back to the starting room. The terminal is closed now, but the right-hand door has opened up – in fact, it was ten doors arranged to form a hallway, which is now open. This leads to the final room – which is actually quite bright – in which we encounter another enemy for the first time again – Compilers! The terminals in the exposition level at the start of this scenario explained that these Compilers are no longer S'pht, but rather "Galaxans", who it describes as "mysterious aliens from another place who hold no malice for humans, but don't like to be crossed." It's sort of odd that they say they have "no malice for humans", because these Compilers are actually hostile! Not only that, but a few of them are invisible! They are all easily dispatched with an Assault Rifle, though you could save ammo by using your Fists. If you retreat out to the starting room, however, the invisible Compilers become significantly more dangerous, as they are very hard to see in the dark. Better to deal with them in the brighter final room, where their shadowy forms stand out against the well-lighted walls. Not much else in this final room, other than the end terminal, which we shall read:
Well, I guess that does it for this level! Next time on Tour of Duty, I'll be taking us through an even longer level, featuring a treacherous door, an open-air courtyard chock-full of pirates, a series of anatomical analogies, and civilians that just won't get out of the way! Vale,
| ||
|
| Replies: |
| Tour of Duty - Click | PerseusSpartacus | 7/31/17 5:12 p.m. | |
| Re: Tour of Duty - Click | Martin | 7/31/17 7:21 p.m. | |
| Re: Tour of Duty - Click | PerseusSpartacus | 8/1/17 5:58 a.m. | |
| Re: Tour of Duty - Click | General-RADIX | 7/31/17 7:39 p.m. | |
| Re: Tour of Duty - Click | Martin | 7/31/17 7:55 p.m. | |
| Re: Tour of Duty - Click | PerseusSpartacus | 8/1/17 6:02 a.m. | |
| Re: Tour of Duty - Click | VikingBoyBilly | 8/1/17 7:54 a.m. | |
| Re: Tour of Duty - Click | Martin | 8/1/17 1:08 p.m. | |
| Re: Tour of Duty - Click | Hokuto | 8/1/17 9:16 a.m. |
|
Problems? Suggestions? Comments? Email maintainer@bungie.org Marathon's Story Forum is maintained with WebBBS 5.12. |