/-/S'pht-Translator-Active/-/
|
|
/-/S'pht-Translator-Active/-/ |
| Tour of Duty - Skinner Box | ||
| Posted By: PerseusSpartacus | Date: 11/19/17 6:38 p.m. | |
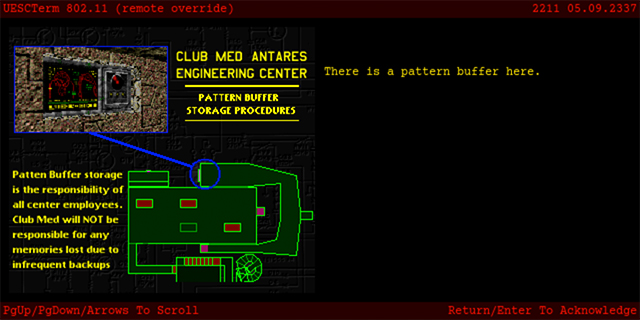
 So, yeah, I took a lot longer than I meant to in getting around to this... again. Hopefully you were all so engaged in watching Rampancy's playthrough of Rubicon X and reading Forrest's Chronicles of Quelouva to notice the total absence of any Tour of Duty content. But still, my apologies for being so negligent about working on this series ñ I've been having a really, really tough time the last three months, and my depression has kept me from being productive about anything. But, as my fortune cookie from tonight said, "now is a good time to finish up old tasks"; and no, I'm not making that up, that's actually what it said. So, to make up for the long delay, this particular tour is going to be a big one ñ and I do mean big! Previously on Tour of Duty, we encountered Troopers, Hunters and Kamikaze Ticks for the first time, went down a massive spiral staircase, waded through sewage (and what a joy that was), fought through whole groups of nasties in pretty tight quarters, and hit a bunch of switches on the way. Now we're... here. Merlin said he needed us to "clear out Maintenance", so I guess that's what we're doing now. To start with, we're in a pretty small quadrilateral room with nothing in it. There's only one door, so we open it. It turns out to be a pretty long opening, and inside it is a Fusion Pistol and some Fusion Batteries. We start to walk through it, and then suddenly our health plummets and we're crushed to death. Remember I promised you last time we'd encounter a treacherous door? Yup, this is that door. It's long, narrow, and has a very short delay before it closes again, and when it closes, it will simply crush you to death ñ if you don't see it coming, it'll kill you before you know what's happening, and then you'll have to trek through the second half of the previous level all over again. And so we're already asking ourselves, "Who designed this level?!" Getting through this door will frequently strip a huge chunk of health away, meaning that unless you managed to pick up the 2x health from the secret room on "liberty bell" and then avoid taking too much damage on "Click" (not an easy thing to do considering the tight spaces and Trooper ambushes on that level), then you'll probably be left with maybe a quarter of a bar of health. Since the first health charger is located behind a lot of nasty enemies, this is a really bad situation to be in. There's a trick to getting through this in one piece, though. If you simultaneously sidestep and run forwards (effectively running forward at an angle) to get through the door immediately, you can make it to the other side well before it even starts to close, thus avoiding taking any damage whatsoever. And of course, as you run through the door you'll pick up the Fusion Pistol and batteries laying inside it (not sure how those fit in there or how they even got there to begin with, but that's FPS logic for you). There's a Pattern Buffer here, facing the door/crusher we just came through, so fortunately we won't have to try going through that again. With a little breathing room now, why don't we pause for a moment to consider the name of the level we're in. "Skinner Box" is another name for what is referred to in technical terms as an 'operant conditioning chamber'. These laboratory devices are used to study animal behavior, specifically 'trained' behavior ñ e.g. rewarding a lab rat with food for responding correctly to certain cues. These contraptions were developed by psychologist B. F. Skinner, who was studying at Harvard University at the time. Thus, the expression 'Skinner box' was coined to refer to them, though Skinner himself did not like being made into an eponym. Returning to the game, we head to our left and find ourselves in a windy set of large, dark corridors, with a bunch of Fighters, some Drones, and a bit of AR ammo in the corners. Nothing too difficult, and a bit of strafing around and punching clears out the enemies in short order. The crowding here often leads to friendly fire on the part of the Fighters, which makes things even easier. A quick glance at the map reveals that this area is labeled "Esophagus" ñ yup, this map is full of anatomical references. Continuing eastwards, we come to a room with some Shotgun Shells in a corner and a Fusion Battery closer at hand. When you look at the Fusion Battery, though, you realize something's not right, and then your mind picks out the shadowy form of a cloaked Compiler. Fortunately, there's only one, and our new Fusion Pistol takes care of him extra quick. This room loops northwest into another room with two pillars, one to the left and one to the right. Around the one on the right are a number of enemies, including a Kamikaze Tick and five Drones. These enemies are strangely unresponsive to gunfire, and go down in short order with a few blasts from the Fusion Pistol. Walking around the back side of the pillar they were hiding behind reveals a nice little ammo cache for our Magnum and the AR. Behind the other pillar is our first terminal, which is a relief:
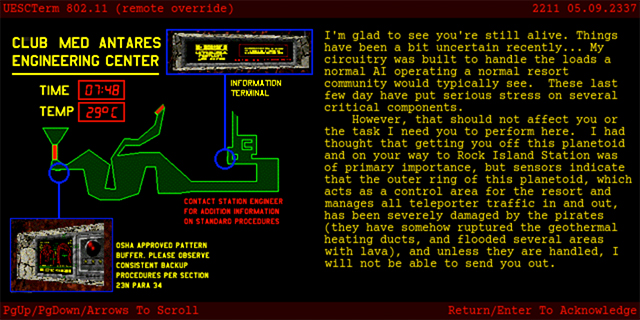
Ah, looks like we need to backtrack a bit. And yes, a health charger does sound awfully good right now.
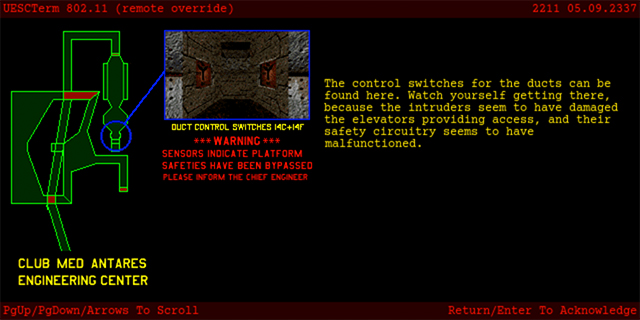
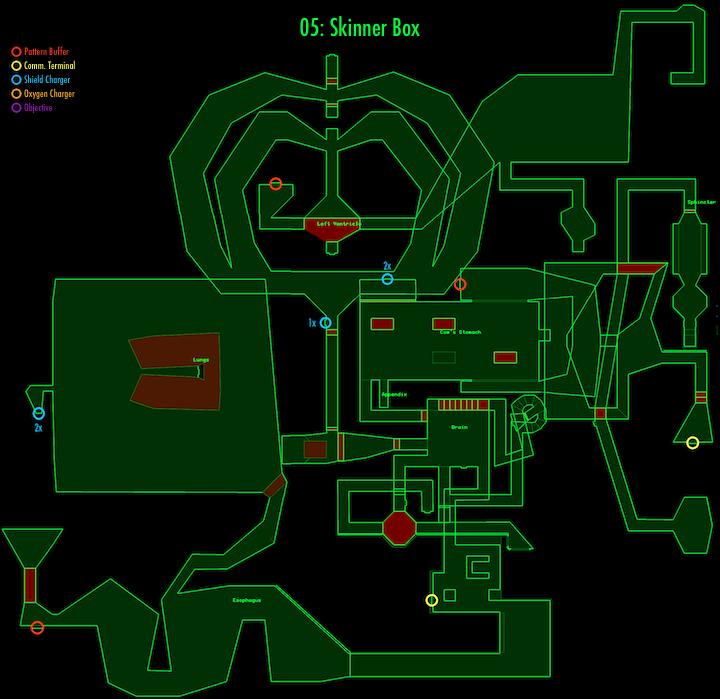
So the safety circuitry on a lot of local platforms isn't functioning ñ that would explain why that door was killing us! Time to stuff a fresh clip in our Assault Rifle and head back to find that switch Merlin was talking about. But first, a glance at the map:
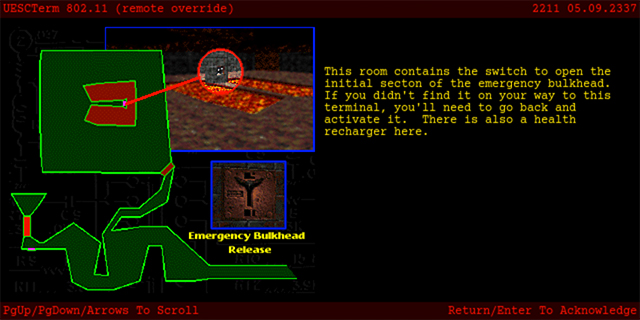
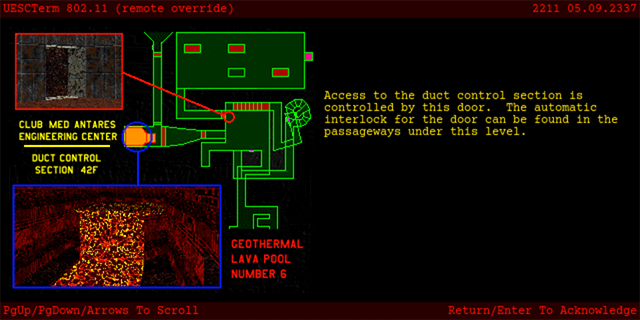
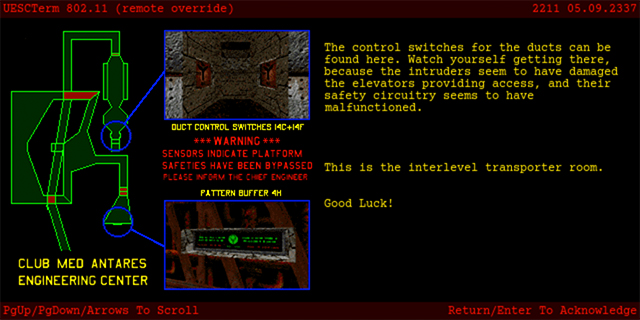
We're down in the southeast, by the yellow circle indicating a Terminal. As you can see, this level's quite a bit bigger than the last one. So we head southwest, back to the middle of the "Esophagus", and take a hallway leading north. Surprisingly, there are actually two lava F'lickta standing in this passage! We encountered a few of those way back on 'Hostage', but they mostly ran around inside of distant lava-filled areas and occasionally threw fireballs at us. We also encountered a few water F'lickta on 'Liberty bell', but the question still remains: why are they here? This isn't Lh'owon, and we're not even supposed to be in the Marathon universe! My only answer is "Hey, it wouldn't be Marathon without a few Lovecraftian monsters running around, right?" Of course, even that isn't satisfactory, because Marathon 1 actually didn't have any Lovecraftian monsters, but anyways, I'm just getting sidetracked here. We go a little further north and find a massive courtyard open to the sky across a small lava stream. In the center of the room is a lava pool with a pillar in the middle. There's a number of enemies here, of all kinds, and when we move in and trigger the lot of them, even more teleport in! There's even a few BOBs that teleport in as well, though they aren't much help and are usually cut to pieces by the aliens within a minute of their arrival. Still, at least they distract the "pirates" while we thin some of their numbers. The best way of dealing with this room is to run around in big circles, firing off bullets and grenades at enemies as you pass by them. The biggest threats are the Troopers, and secondly the Hunters, so prioritizing them is a good idea. Once they're dealt with, the Fighters are easy pickings. A small walkway leads through the west side of the lava to the pillar in the center, where there's a switch ñ this must be the one Merlin said "open[s] the initial section of the emergency bulkhead." On the western wall is a door leading to a small room with a 2x Health Charger in it ñ very handy! Initially there are three Grenade packs in front of this door, along with two more Fusion Batteries just east of the lava pool. What I didn't realize until I examined the map in Weland was that there's also ten Shotgun Shells inside the lava on the eastern side. It's a bit of a drop, so you'll need to be quick about swimming down there and swimming back up, but at least you'll be at 2x shields to start with, and then afterwards you can refill with the Shield Charger nearby. As for anatomical analogies, if you glance at the map you can see that this courtyard is labeled 'Lungs'. It's certainly airy in here, if that's what the creators meant! Our job being done here, we can make a trip back to the Pattern Buffer at the start, before continuing on past the Terminal on the east side. A narrow corridor winds north to a tall room called the "Brain". Along the far wall when we enter is a staircase that raises and lowers whenever you walk through the entry door ñ a very odd mechanic, to be sure, but first, we need to deal with some baddies. On the aforementioned staircase and in a raised hallway way up above our left shoulder are two Hunters, three Fighters, three Drones, and a Trooper. Not too dangerous, especially since they can be lured into following you single-file down the entry corridor. The Brain acts as the central hub of the level, albeit in a very confusing way. A number of passageways lead out of it, but right now two of them are too high to reach and another two are locked doors. That leaves the northeast exit, which must be reached via the staircase. Just walk across the door we entered by to alternately raise or lower the staircase until the right-hand side of it is at ground level. Then, walk up the staircase and turn around. There's a switch up high on the southern wall ñ when shot, this will also cause the staircase to raise or lower, and in our case, it will raise the other side, allowing us to run over to the northeastern hallway. This is actually my least favorite part of the level ñ first, the lighting in this hallway is atrocious: it flashes super-bright and super-dark, and is pretty much designed to cause an epileptic fit, or at least completely disorient players. This winds northeast through a curved staircase and then heads back southwest. There's more Hunters in here, but in these cramped hallways the AR can finish them off in no time. Eventually we drop down (out of the flashing lights, thankfully) into a dark corridor that leads back north... to the Brain. We're right back where we started, now looking down on it from above. Walking up to the edge causes a monster closet to open behind us, releasing two Troopers to ambush us. There's nothing else up here, and no way to climb back into what I'll call the Epileptic Hallway, so we have to drop down again. This is the second thing I really hate about this level: at this point, just walking around in the Brain or the earlier areas, nothing appears to have changed. It's only when you go back up to the Epileptic Hallway that you'll find what's changed: on the inside of the curved staircase, there's a secret door that's opened to reveal two Troopers, a Fusion Battery, and a switch. It's unclear what caused this to open, until you look in the map editor and realize that at the end of the Epileptic Hallway, just before dropping down into the dark ledge where the Troopers ambushed us moments ago, there's a polygon that triggers this secret door to open ñ meaning we never even had to get ambushed by those Troopers in the first place, if we'd just known what happened there! And right about now is when I start to realize the third thing I hate about this level: so much of it is similar to other parts of itself, and this leads me to use the same terminology over and over again ñ e.g. "now we enter a room", or "a dark corridor", or "a long hallway". I apologize for the repetitious feel, but that's just how this level is. So, we hit the secret switch inside the curved hallway, and then return to the Brain, to discover that the previously locked door in the southwest is now open, revealing two more Troopers and an elevator. This lift takes us up to an unusually different area (different for this level, anyways): a long ledge with windows looking out into the open. From here you can see some large grey structures, which are supposed to represent the outside of the early parts of the level (such as the Esophagus). There's some Fighters up here, and some Fusion Batteries at the eastern end of the ledge. Going the other way, we meet some Compilers, who are easily dispatched with the Fusion Pistol, and we also find a switch. Returning to the Brain, it's not clear what the switch did, but if you go back through the Epileptic Hallway to the dark corridor where the Trooper ambush was, you'll find that you can jump to a ledge in the very west. Jumping here earlier would've led to a locked door, but it is now open since we hit that last switch. We therefore come to a short drop-off near a small exposed pit of lava. To the left of the lava pit is another Pistol, which means we now have dual Pistols (not particularly handy, considering we already have an AR, a Fusion Pistol, and two Shotguns, but every little bit helps). If we jump down, we find that the polygon just in front of the drop-off is actually a platform, so we can go back at any time ñ good to know! This area was actually shown to us earlier in the first Terminal:
Admittedly, not the best picture, but you can clearly see the aforementioned lava pool in the bottom left. We open a door heading north, to find ourselves face-to-face with a Compiler. We blast him away, only to find six Fighters behind him. These enemies aren't tough by any means, but the tight spaces here make it difficult to maneuver ñ cyborgs aren't meant for narrow corridors! Or is it that narrow corridors aren't meant for cyborgs? Regardless, this level has a lot of small spaces, which quite frankly are very annoying ñ I'd far rather be running around the open air of a level like "Eat It, Vid Boi!". Fortunately, things are about to change a bit. Heading north, we come to a more open section, with a very high ceiling. To our left as we come out of the northern-most door is a 1x Shield Charger ñ not very handy, considering there's a 2x charger back at the 'Lungs'. Speaking of which, punctuating our crazy journey through this marathon of a level (pun unintended but also unavoidable) would've been numerous trips back to the beginning of the level to visit the first Pattern Buffer and recharge at the 'Lungs' along the way ñ I didn't mention these because it would've broken the flow too much, but depending on how well you can avoid Trooper grenades, you might have to do that particular bit of back-tracking many times during the course of the level (yet another reason why I find myself increasingly disliking this map). Past the 1x Charger, this gigantic hallway goes either left or right, branching into two narrower hallways on both sides. This forms a shape which is largely symmetrical and resembles two circles fused on the southern side. This area is referred to on the map as the 'Left Ventricle', so I guess that's what I'll call it. Frighteningly, this area contains not one, but two MOACs (that's "Mother of all Cyborgs"), as well as a MOAH ("Mother of all Hunters")! There's also a small number of Fighters in this area as well, but they're hardly a threat. The biggest threats here are the MOACs, which will shoot tracking bombs that are difficult to evade. The best course of action here is to fire a few shots and then run away, rather than engage in a straight-up firefight. Ideally, you'd get the MOAC to follow you around for a while, until you can get to one of the big forks (where the inner circle meets the outer circle), and use the inner wall for cover so that the tracking bombs just go into a wall. If a MOAC shoots at you from down one of the circles and you have nowhere to go for cover, just run away using the forward-sidestep trick ñ that's pretty much the only way to guarantee that you'll be able to outrun the bombs. My absolute favorite strategy for the Left Ventricle, though, is to try to create friendly-fire between a MOAC and a MOAH and then run away. Once they've turned on each-other, they'll move in for a melee fight. The MOAC will always try to use its Flamethrower at this close range, but Hunters are immune to flame damage, and so the MOAH will just slowly eat away the MOAC's health until it blows up. This explosion will in turn weaken the MOAH, softening it up for an easier kill. I've only ever gotten this to happen with one MOAC, but it's actually not that hard, so you could probably do this for both MOACs if you handled it right. At the center of the Ventricle is a switch (Switch A, we'll call it), which opens a door at the very northernmost point of the Ventricle (Door A). This door reveals another switch (Switch B), which in turn lowers a platform in the center of the Ventricle. Opposite Door A is another door (Door B), which can be opened to reveal a teleporter, which takes you back to the center of the Ventricle, where the platform just lowered. Dropping down, we encounter some Compilers, and head West to find a Pattern Buffer ñ very nice! Heading East, we find more wide hallways, with a few Hunters in them. A teleporter in the south of this area takes us back to the start of the Ventricle ñ not particularly useful. Further East, however, is another teleporter which takes us back to the Brain. This is more useful, because the polygon in front of this teleporter is a Platform Trigger that opens the final door in the Brain. Of course, there's no way you'd know this in-game ñ you'd probably just think that one of the switches you hit earlier opened that door. As with many of this level's secrets, I discovered this through investigation in Weland. It's been quite a while since we last looked at the map, so before we go any further, I might as well remind you how it looked:
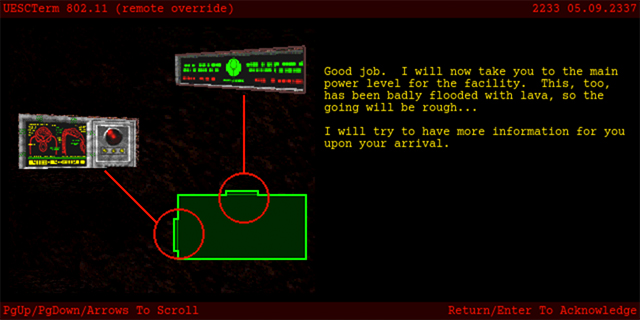
We go north and a little west from the Brain to arrive at a ledge overlooking the "Cow's Stomach". This is a giant room with several large platforms in the middle and some other high ledges around it. There are some Troopers and Fighters in this area, but they're easier to deal with in this open space ñ a welcome change from the unnecessarily claustrophobic corridors we've been running around in for probably around 40 minutes now. This level certainly gives the feeling of being a lab rat, subject to the seemingly pointless tormenting of larger beings (or in this case, map designers). The western-most platform on the ground is low enough to step onto, and when you do, it begins to rise at a good speed. If you stay on it too long, it will crush you against the ceiling, but you need to use it in order to get up to a ledge in the northwest, where another 2x Shield Charger is available. From there or from the first platform, you can jump to the middle platform, which is too high to reach from ground level. From this, you can jump to the eastern-most platform, which lets you jump to the southeastern ledge. There's a bunch of Fighters here, which are best mowed down with an Assault Rifle. There's also a teleporter that just takes us back to the first ledge in the southwest. Going north and west, you'll find a Pattern Buffer on the opposite side of the Cow's Stomach. We're now entering the final stages of the level, thankfully, but there's still a bit more to do. Heading east, we come to a three-way fork. Going forward, we come to a door. This door opens when we cross through an inexplicably well-lit part of the hallway ñ this reminds me a lot of the bizarre light-triggered spike trap in Raiders of the Lost Ark. Unfortunately, there's a locked door directly behind this one, so this doesn't lead anywhere... yet. Going left just leads to a dead end. Going right (i.e. south) takes us to a drop-off, which brings us to one of the more unusual areas of the level. There's a big room here, as well as two corridors, one leading north to a platform, the other leading south to a smaller chamber containing a bunch of BOBs, some of whom are actually Simulacrums! The easiest thing to do here, frankly, is to just kill them all ñ otherwise they're very likely to get in the way while you're trying to get out of this area. And getting out is actually harder than it sounds. See, between the corridors is a small platform that will activate when you walk on it ñ this goes all the way up to the ceiling and will cause you to smack your head if you ride it all the way, but it's the only way to go back to the ledge we were just on. We'll call this "Platform A". The only other way out, and the way we want to go, is another platform in the north ñ we'll call it "Platform B". For now, Platform A is just a nuisance. Platform B is triggered as soon as you step into the northern corridor to get to it, and is also controlled by a switch at the entrance to the southern corridor; it is therefore difficult to get onto and activate. The best plan is to walk up to it, let it run a cycle, then step onto it and trigger it with a charged Fusion shot fired at the southern switch; the Fusion Pistol is slightly inaccurate and the switch is barely visible, so you'll need to try several times to make this work. As soon as it triggers, you need to be ready to run into a door on the north side of the platform ñ otherwise you'll get crushed to death. Merlin was definitely right when he said the safety circuitry on the local elevators was malfunctioning! Following this corridor north leads us to the 'Sphincter', a hallway chock full of enemies, mostly Troopers with some Hunters and Drones thrown in the mix. Use the corner for cover and gun down anything that comes at you with the AR. Going south, we find a Hunter on a ledge and two switches. These switches are functionally identical, and flipping one will also flip the other. Logically you would assume these switches opened the locked door that we found not long ago, but in actual fact that door is opened by walking over the hexagonal polygon just north of those switches, so I have no idea what they really do. Now we can head back to Platform A and go east. Sure enough, the previously locked door is now open. You just need to run through at top speed, because the front door (the one triggered by walking through the light area) closes itself again very quickly ñ one final nuisance to round out a tortuous and painful level. And thus we come to the final room ñ what a relief! Let's see what Merlin has to say:
Hey, the going can't be any rougher than what we've just been through, right? So I guess that wraps it up for this installment of Tour of Duty. Next time we'll explore a much smaller level with a lot more lava, and get flashbacks of a converted church somewhere in Italy. Until then...
Vale,
| ||
|
| Replies: |
| Tour of Duty - Skinner Box | PerseusSpartacus | 11/19/17 6:38 p.m. | |
| Re: Tour of Duty - Skinner Box | General-RADIX | 11/19/17 10:13 p.m. | |
| Re: Tour of Duty - Skinner Box | PerseusSpartacus | 11/20/17 6:09 a.m. | |
| Re: Tour of Duty - Skinner Box | Martin | 11/20/17 12:33 p.m. | |
| Re: Tour of Duty - Skinner Box | PerseusSpartacus | 11/20/17 1:04 p.m. | |
| Re: Tour of Duty - Skinner Box | Martin | 11/20/17 11:43 p.m. | |
| Re: Tour of Duty - Skinner Box | PerseusSpartacus | 11/21/17 8:27 a.m. | |
| Re: Tour of Duty - Skinner Box | VikingBoyBilly | 11/21/17 4:06 p.m. | |
| Re: Tour of Duty - Skinner Box | PerseusSpartacus | 11/21/17 7:45 p.m. | |
| Re: Tour of Duty - Skinner Box | VikingBoyBilly | 11/22/17 2:07 a.m. | |
| Re: Tour of Duty - Skinner Box | PerseusSpartacus | 11/22/17 10:17 a.m. | |
| Re: Tour of Duty - Skinner Box | Yossarian | 11/23/17 5:10 p.m. | |
| Re: Tour of Duty - Skinner Box | PerseusSpartacus | 11/23/17 5:17 p.m. | |
| Re: Tour of Duty - Skinner Box | VikingBoyBilly | 11/21/17 3:58 p.m. | |
| Re: Tour of Duty - Skinner Box | VikingBoyBilly | 11/21/17 3:50 p.m. | |
| Re: Tour of Duty - Skinner Box | PerseusSpartacus | 11/21/17 7:53 p.m. | |
| Re: Tour of Duty - Skinner Box | nevets01 | 11/22/17 7:41 a.m. | |
| Re: Tour of Duty - Skinner Box | VikingBoyBilly | 11/22/17 1:05 p.m. | |
| Re: Tour of Duty - Skinner Box | PerseusSpartacus | 11/22/17 1:37 p.m. | |
| Re: Tour of Duty - Skinner Box | VikingBoyBilly | 11/22/17 2:09 p.m. | |
| Re: Tour of Duty - Skinner Box | PerseusSpartacus | 11/23/17 7:42 a.m. | |
| Re: Tour of Duty - Skinner Box | Yossarian | 11/23/17 4:54 p.m. | |
| Re: Tour of Duty - Skinner Box | nevets01 | 11/25/17 4:52 a.m. | |
| Re: Tour of Duty - Skinner Box | VikingBoyBilly | 11/22/17 1:59 p.m. | |
| Re: Tour of Duty - Skinner Box | General-RADIX | 11/22/17 3:50 p.m. | |
| Re: Tour of Duty - Skinner Box | VikingBoyBilly | 11/23/17 3:02 a.m. | |
| Re: Tour of Duty - Skinner Box | nevets01 | 11/25/17 4:44 a.m. | |
| Re: Tour of Duty - Skinner Box | Yossarian | 11/23/17 4:58 p.m. | |
| Re: Tour of Duty - Skinner Box | VikingBoyBilly | 11/21/17 4:11 p.m. | |
| Re: Tour of Duty - Skinner Box | VikingBoyBilly | 11/21/17 2:56 p.m. | |
| Re: Tour of Duty - Skinner Box | PerseusSpartacus | 11/21/17 7:49 p.m. |
|
Problems? Suggestions? Comments? Email maintainer@bungie.org Marathon's Story Forum is maintained with WebBBS 5.12. |