/-/S'pht-Translator-Active/-/
|
|
/-/S'pht-Translator-Active/-/ |
| Tour of Duty - Bats in the Belfry (Part 1) | ||
| Posted By: PerseusSpartacus | Date: 7/23/18 3:53 p.m. | |

Part 1 Hello again! Pardon the delays, I've been quite sick this past week, and that has prevented me from working on, well, anything really until now. Last time on Tour of Duty, VikingBoyBilly took us on a trip through the crash-landed UESC Santa Fe, fighting off a fair number of Cyborgs and Troopers along the way. At the end, someone (though I'm not sure who) told us that we needed to "Determine location of enemy home base," whatever that means. The story hasn't been all that interesting, and at this point I have very little idea what we're even supposed to be doing. I've noticed I use a lot fewer images than I should in my posts, so I'll try to use more of them this time - a picture is worth a thousand words, after all. Also, because this level is long and full of weird little details, I've decided to split this write-up into two parts to be posted separately. It will take me a while to finish the whole write-up (longer than I'd hoped), and so this will also allow me to get something out the door in a reasonable amount of time. Before we get into going through the level itself, I have to begin with a warning: this level is one of those devilish constructions that will absolutely make you want to rip your hair out in frustration. This is due to a few main factors: 1) This is a vacuum level. 'Nuff said.
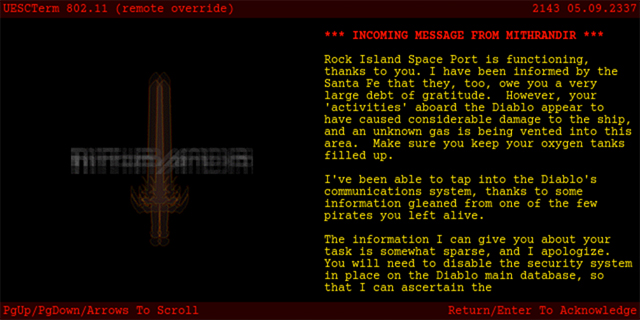
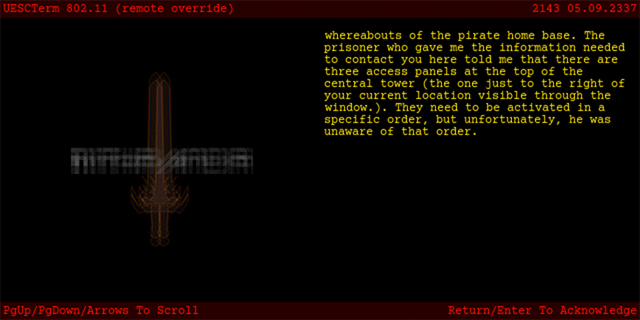
To help you follow along (because this one is going to be tough to follow otherwise), I'll show you the overview of the map to start with, and then I'll provide updates on what the automap looks like as I go through the level:  If the map looks confusing right now, it feels a lot more confusing when you're actually in it. This is not immediately apparent when you first enter the level, though. You start in a fairly simple chamber, with two hallways looking down on you and a window looking outside. In one of these hallways, to your south, some Fighters will immediately teleport in - there's also a switch visible behind them. Unfortunately, there's glass between you and them, so you can't shoot them or activate the switch from here. To the east are two doors: the one on the right is fake, while the left one takes you up some stairs. At the top of the stairs, you'll enter a room and a bunch of enemies will teleport in to your left and right. Most of them are Fighters, only two of whom are of the ranged variety, but there is one Trooper on the right side - he's the main threat here. You can use Shotguns to take him down quick, but I'd advise not using up too much Shotgun ammo - you'll probably want to save some for the final room. Dual Pistols work well on the Fighters, but don't be afraid to use your Fusion Pistol; there's going to be plenty of ammo for it laying around. With the first wave of enemies dispatched, you'll find a Pattern Buffer and a Terminal next to a window. The window looks over a large room with a central column and various ledges overlooking it (one of which has some Fighters standing on it, but we can't get to them because they're behind glass) - this is where we need to get to, roughly speaking. Let's read the Terminal:
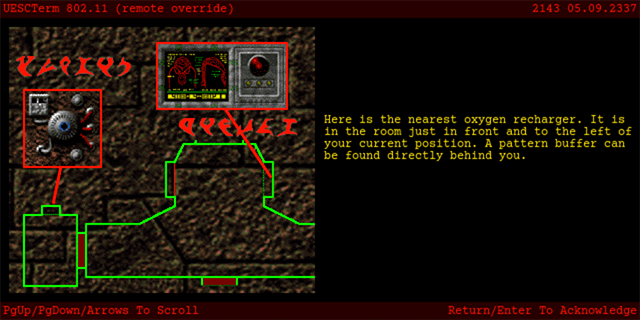
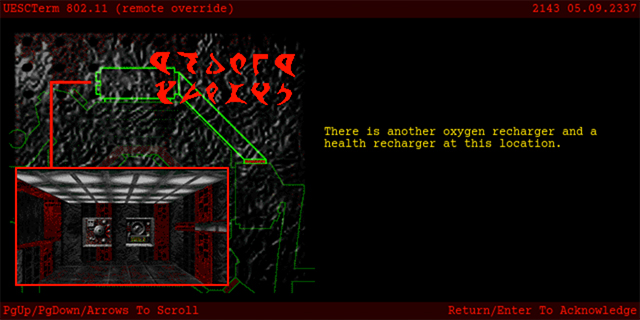
All good information. Plus, it's worth noting that the rationale for the vacuum here is not actually that it's a vacuum, but simply that there is some type of toxic gas flooding the area; this is a neat idea, and I'm a little surprised that other scenarios haven't used this excuse more often. To the west of your present position is the room with the Oxygen Charger, some Fusion Batteries, and a single Pistol Magazine. To the east is a monster closet, now empty, and a single door, which does not respond to the action key. This door is actually activated by stepping on a polygon just in front of the closet with the oxygen charger, but it will close after a short while. On the other side of it is a switch, which also controls the same door - as soon as you walk through, you'll want to flip it to 'off' so that the door becomes locked in place. Keep in mind that it will close again if you walk over to the oxygen charger. Let's have a quick map update:
Alright, so this map is premised around getting into the central column in the room I'm calling the 'End Chamber'. The problem is that to get there, you have to open a lot of locked doors, which means hunting for switches, some of which are themselves behind locked doors that can only be opened by other switches. Yeah, this isn't gonna be fun. So you head south into a corridor - this goes west, but as you step through it, you'll trigger a door to open leading south again. Inside the room that is thus revealed are a bunch of Fighters, two Troopers, and an invisible Compiler. The Troopers start out inside a column/closet, and may be a bit reticent about coming out of it. The door closes after a short delay, so you have to move around in the corridor a little bit to get off and back on the trigger polygon. Going further west in the corridor just leads to an empty hallway with a window overlooking the starting room. Before continuing, I would advise going back and recharging on oxygen - you are going to want as much as possible before heading into the room that had all the enemies in it, because once you're in there, you won't be able to go back; the door closes after a delay and there's no way to open it from that side. This room also overlooks the starting area, and there's a 1x Shield Charger in the southernmost part. A door across from it leads to the very first switch we saw, the one we couldn't get to from the starting room. This actually opens a door at the west end of the opposite corridor - but we can't get there any more, at least not right now. Inside the closet from which the Troopers came are some Fusion Batteries. To the southeast is a small room with some barrels, some Pistol Magazines, and some enemies who teleport in - not particularly helpful. To the northeast is another room that appears at first to be a dead end with some more pistol and fusion ammo. You'll probably start wondering at first where the heck you're supposed to go from here - there's no obvious exit from this section of the level! Actually, this is where the first "secret" door comes into play. On the north side of this room is a bright red slit in the wall - if you tab on it or right next to it, nothing happens. But if you tab a few inches further to the right, you'll open a door. To illustrate, here are photos of the room with the door closed and with it open (note - I turned up the brightness on these two photos to make them more illustrative; most of the level is so dark that photos are not particularly helpful):
Now, I should point out that if you look through the red slit to the left of the secret door, you can see what looks like the wall of another corridor on the opposite side - the automap helps confirm that that is in fact another hallway that you are looking at through there. That should give you at least some clue that a door is supposed to be around here. This takes you into a strange room with some winding stairs and a ton of scenery cylinders scattered around it:
On the upper level of this room, an invisible Compiler teleports in. His tracking shot is very difficult to dodge with so many cylinders sitting around to block your movement. To the left, however, something else teleports in: a S'pht'Kr!
Well, at least in the original Marathon universe we'd call that a S'pht'Kr or a Defender - but in the DiaBD universe... actually, I don't know what this is supposed to be, canon-wise. Is this another Ygn'oml (aka Galaxan)? Regardless, it's friendly, and it may even take a few shots at the invisible Compiler. The Defender can't really go anywhere, as it is trapped by the cylinders, and will just pace back and forth in its little corner. In fact, if you go around its corner and step into the nook that it guards, you'll trigger a platform inside the closet that contained the Troopers and Fighters a short while ago. You can actually go back there and reach a lower part of the level - the "Basement", if you will. However, I think I'll save that part for later; for now, let's just keep moving forward and looking for the 2x Charger and Oxygen Charger that are supposed to be located up north. You walk south, past a locked door, around a corridor that loops back north. This leads to a brightly lit section of the corridor - if you step on this section, it will begin to descend after several seconds... directly into lava! Yes, there's a trap hallway here that you have to run through fairly quickly in order to not get dunked in lava. I told you the designer of this map was wicked! This brings us to a fork. Heading left (i.e. south) actually opens a locked door, leading us back to the stairs just outside the room with the Terminal and the Pattern Buffer! Unfortunately, the door that we tried so hard to keep open appears to have been shut again regardless of our efforts. Don't worry, you don't have to go back there again - though it might have been nice to be able to return to the Pattern Buffer. Heading back the other way (i.e. north) leads to some Fighters and another Defender - and we are now overlooking the End Chamber again, this time from its east side. There's a switch here, but we'll come back to that. Continuing north leads to the room with the 2x Shield Charger and the Oxygen Charger; very nice! What's not so nice is that on the right side of the room is a narrow window, behind which is a room with two drones and some Fusion Batteries - though it is unclear how to get in there:
Okay, time to get our bearings again:  As you can see, things are beginning to get a bit more complicated - but we're not really even halfway through the level yet! Now fully recharged, you head back the way you came, and encounter that switch from a moment ago. Pressing it causes one face of the central column in the End Chamber to slowly open, unleashing what can only be described as a horde of Drones. Thankfully, there's glass between you and them, and there are even a few Defenders in the End Chamber to shoot some of them down, but there's just too many Drones for them to handle. The column does not stay open, though - you need to turn the switch off once you can see that the side is open enough for your liking. I say you need to because you don't want to leave that horde inside the column - you're going to need to go in there at some point, and if they stay in there, you'll have no chance of fighting them off. Now, you might be inclined to say something like "Ha! What are a few Drones to the likes of me?" In that case, I must show you the sheer number of Drones we're talking about here:
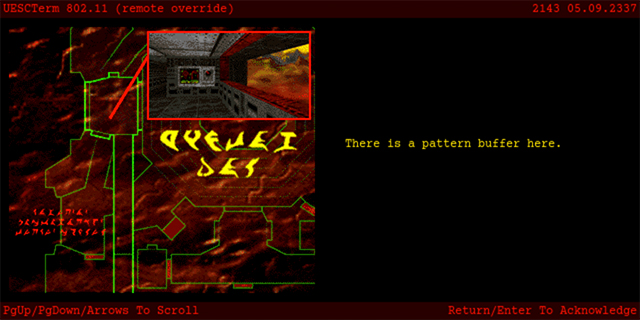
You can see why I called it a "horde" and not merely a gaggle. :) And the worst part is, the Drones actually respawn - albeit somewhat slowly, and there is a limit to how many can ever spawn in the course of the level, but the point is that if you just leave them to their own devices, they should continue to spawn until there are about 25 of them in that area. Now, that number might be manageable in an open area where you're given lots of room to dodge their shots, but that's not how it's going to be when you actually fight them. In short, just know that the horde is waiting for you... It's no longer obvious where to go anymore, so time to start going back over old ground. You head south again, back down the stairs past the now-forever-sealed door, and turn west, into the corridor just north of your original starting position. You open a door, and find a group of Fighters and a Hunter are waiting for you - those weren't there before! These were unleashed by the first major switch we hit, across the way, also allowing you to progress further westward. This leads you north again, now on the west side of the End Chamber, and you find a Pattern Buffer and a Switch. What does the switch do? Well, oddly enough, it opens a door revealing a ledge on the other side of the End Chamber:
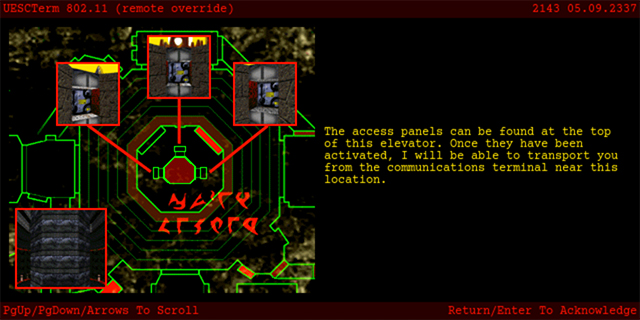
Well, with the Pattern Buffer, we get to save our position and gather ourselves:
The purple circles are the main switches we've encountered, and the arrows coming off of them point to the platforms they control. As I said at the beginning, I'm splitting this write-up into two parts so that it doesn't run on too long. This is a good place to pause, as we've just encountered a Pattern Buffer and now need to find somewhere new to go. Next time, we'll explore the basement, locate secret doors, and ascend to victory! Until then... | ||
|
| Replies: |
| Tour of Duty - Bats in the Belfry (Part 1) | PerseusSpartacus | 7/23/18 3:53 p.m. | |
| Re: Tour of Duty - Bats in the Belfry (Part 1) | General-RADIX | 7/23/18 5:32 p.m. | |
| Re: Tour of Duty - Bats in the Belfry (Part 1) | PerseusSpartacus | 7/23/18 6:24 p.m. | |
| Re: Tour of Duty - Bats in the Belfry (Part 1) | Martin | 7/23/18 10:20 p.m. | |
| Re: Tour of Duty - Bats in the Belfry (Part 1) | Durandal_1707 | 7/24/18 8:37 a.m. | |
| Re: Tour of Duty - Bats in the Belfry (Part 1) | VikingBoyBilly | 7/26/18 3:17 a.m. | |
| Re: Tour of Duty - Bats in the Belfry (Part 1) | Durandal_1707 | 7/26/18 7:33 a.m. |
|
Problems? Suggestions? Comments? Email maintainer@bungie.org Marathon's Story Forum is maintained with WebBBS 5.12. |