/-/S'pht-Translator-Active/-/
|
|
/-/S'pht-Translator-Active/-/ |
| Tour of Duty ľ Sensori OverLord | ||
| Posted By: Martin | Date: 5/29/18 12:45 p.m. | |
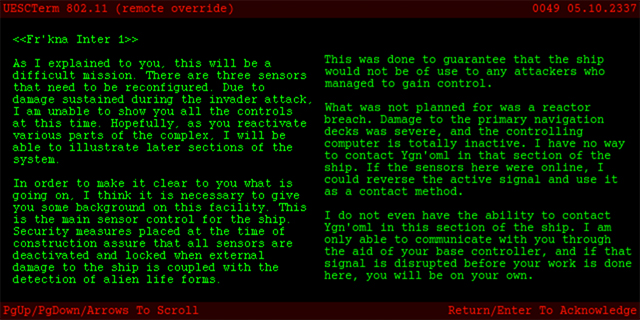
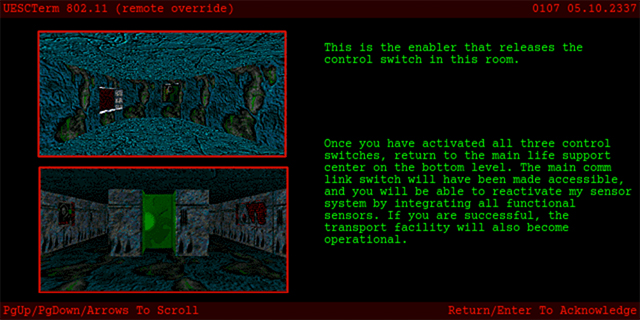
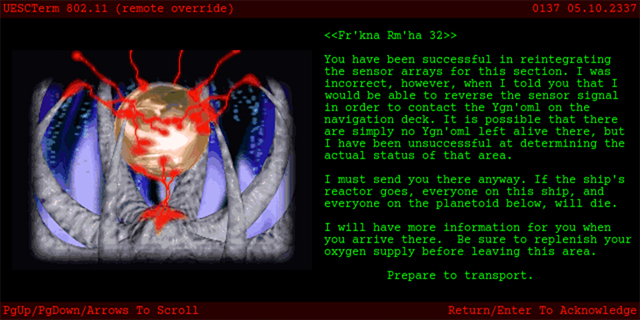
 Last time on Tour of Duty we explored a very strange level, complete with crash bug in Aleph One that meant we had to diverge from the intended path, to the point that we maybe reached the final terminal rather early on but found it not yet enabled. Or not. Either way, after we ran around and killed things, we got it going and met a new AI, Frĺkna, who was quite talkative and descriptive of what was going on. It could not send us to the damaged reactor but was going to send us into a vacuum area to have us fix some damaged sensor arrays. And that is indeed where we have ended up. So thatĺs nice for a change to start with! We arrive in a small inauspicious room with a Pattern Buffer, a terminal, and an oxygen recharger, which we will probably need to use before even getting through the terminal, because it is incredibly wordy. Iĺm not sure there is one like it anywhere else, at least not one where we need to pay attention, and yeah that ... it is information overload to kick off a particularly evil level. The automap is as useless as for most of The Hard Stuff Rules... and we have to hit rather a lot of switches, and in a reasonably dictated order. Also: following the directions is hard; the place is full of continually respawning Drones, Ygnĺoml (yet another new word for Sĺpht), Troopers, and Hunters; there are loads of different heights involved; and again, itĺs vacuum. To its credit, Frĺkna does make a real effort to help us out here, and explains why we have to do this job: their failsafes planned for most things, with security measures set to deactivate sensors on external damage + aliens, and no communication with the Ygnĺoml so they canĺt do anything to help, and will likely attack us. And YEP, one came to find me before I finished with the terminal. This is also the only level I can recall where the left pane in the terminals is used for text as well as the right. An interesting effect that just adds to the feeling of too much information. Sensory Overload ů yes we see what they did there!!
Letĺs try to piece it together:
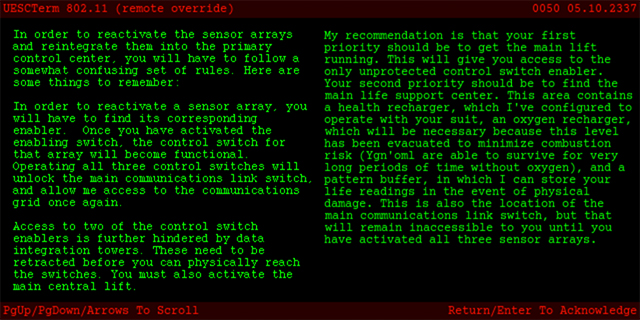
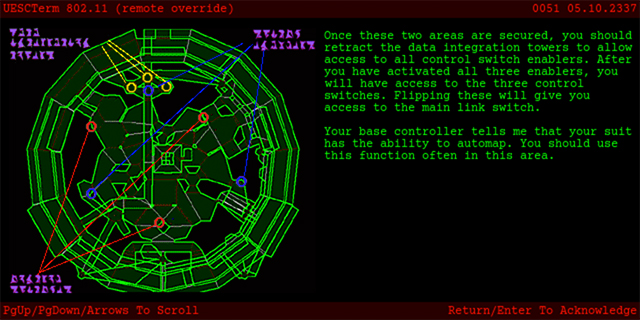
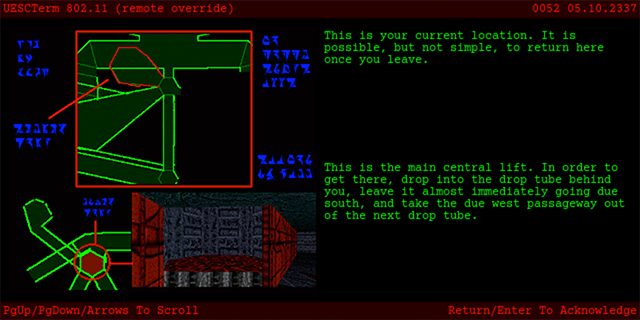
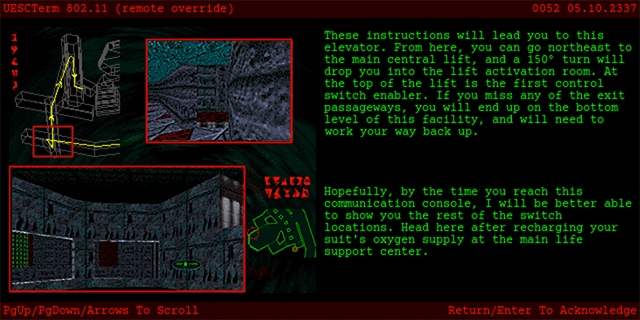
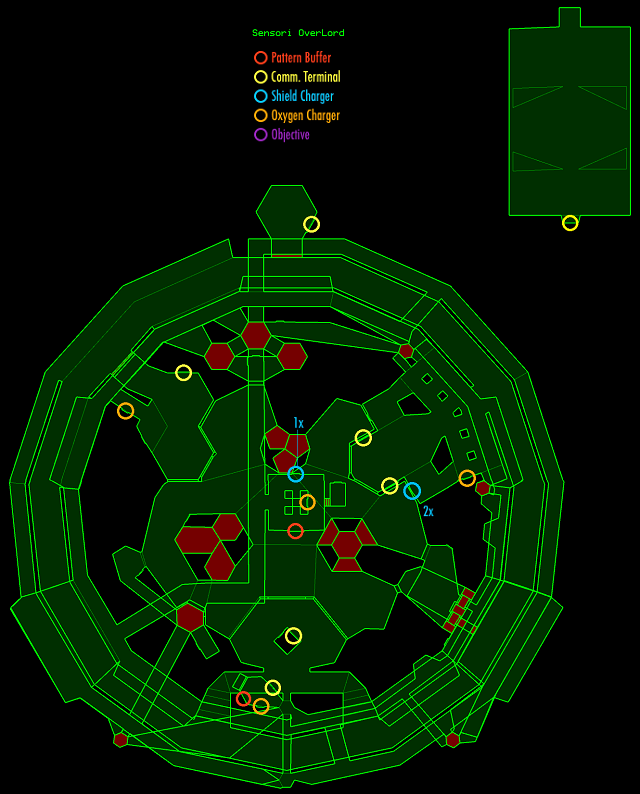
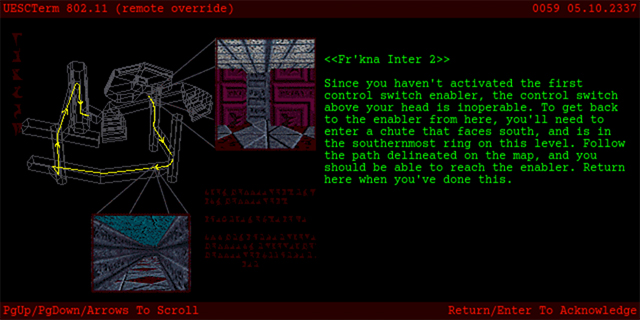
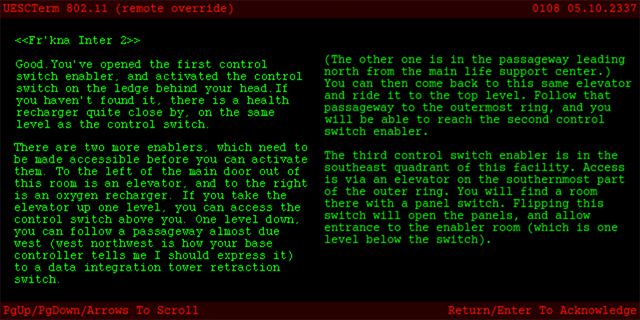
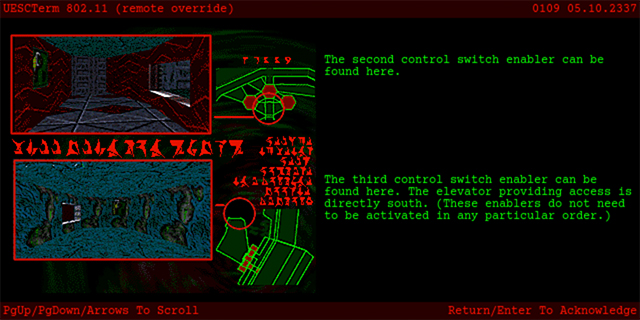
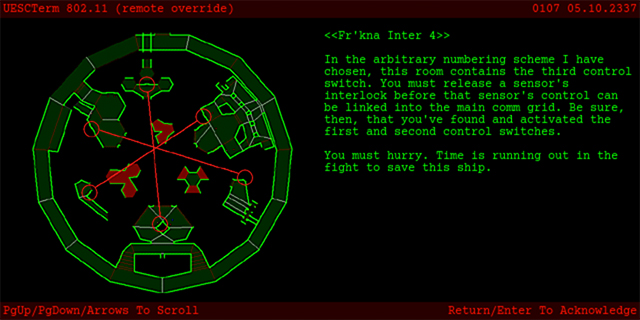
2. Two of the three are behind another obstacle in the form of data integration towers that we have to retract. 3. We need to activate the central lift, and this should be the first priority. To reach it, we drop down out of this room, head south, drop down again, head west to a lift, ride it (presumably), then head northeast, and then turn 150 degrees (clockwise?) to find the lift activation room and our first switch. And if we screw it up, weĺll fall to the bottom level and have to climb back up (that seems more likely). 4. Then we need to find the life support area with another Pattern Buffer and rechargers, but itĺs not clear how. 5. Finally for now we need to head to the next terminal, which we can see, if we look back at the whole map view in the terminal, is in the northeast of the map, accessible by a lift. The map with the coloured markers is confusing, but it seems that the yellow ones are the data integration towers, the blue ones are the enabler switches, and the red ones are the reactivation switches. I donĺt speak purple blob; thatĺs just what I now gather based on having played the level comparatively blind :). I think I had it figured out when I first played years ago ů but that was years ago. Okay. Amazingly that actually worked when I had it all written down. I was suspicious from looking at the map, what with how close to the south we start out, but there you go. I had to turn around to see the lift as I headed west, and to realise that with the central lift not active, I needed to jump across down the shaft to the activation room, and I can even understand the 150 degree turn thing. Yep that checks out! And here is said map; hopefully it makes enough sense without further annotation; y'all know I'm lazy or uneasy about uploading pictures everywhere.
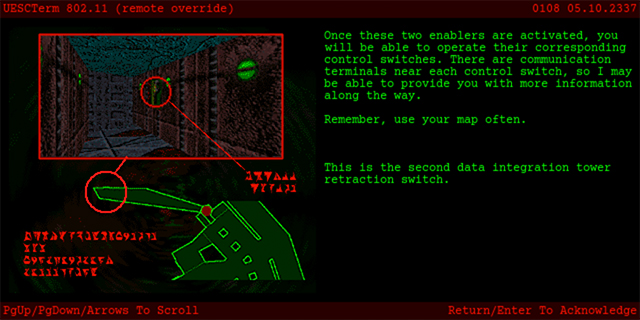
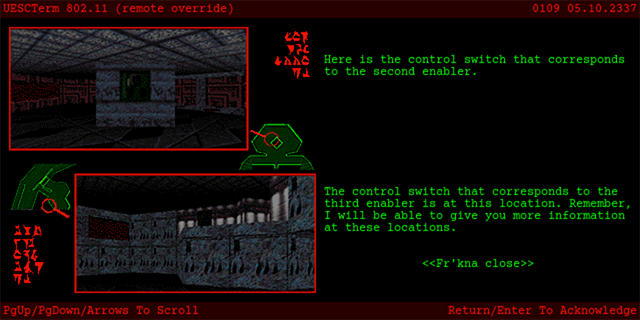
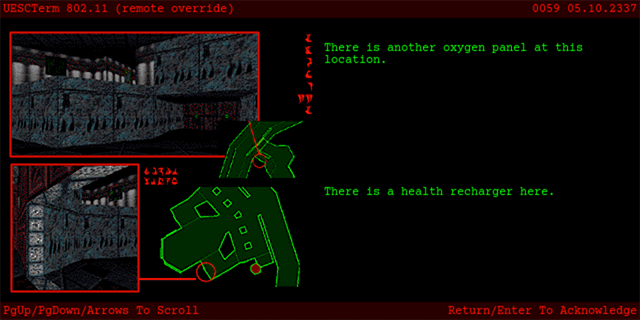
The main confusing part is that on leaving the start room, with the terminal, Pattern Buffer, and oxygen charger near the bottom middle, you have to head south before you hit the bottom of the ôholeö, or you end up on the aforementioned bottom level of the area. And the same for the next turn to the west. That is no doubt where it goes wrong for most people, and for me on earlier plays. Or as I like to call it: Amazing Map Design. The map in 2d -looks- pretty simple, but boy is that deceiving. Anyway, that's one switch hit and the lift is coming up! We can ride it and get to another switch room to the northwest, the first enabler switch, again just as described. If we look out the window there, we can also see a switch on the outside of the inner ring area of the level, and that one opens a secret room back up where we started ľ so we need to work out how to get back there on top of everything else! Conveniently, the life support area is just a short walk north from the bottom level of that central lift, past some Hunters and other Pirate Scum. The shield recharger (which Frĺkna does refer to as a -health- recharger!) is only a 1x, but it does get better. The corridor past where we came in to the life support area comes to a dead-end, but it has one of the data integration tower switches on the left wall there ľ just not for the one right in front of us at that point! If we come back out past the central lift, we can enter the inner ring of the level, and freely trip around to the east, towards the lift that was visible in the picture we saw of where the second terminal is. At the top of this lift, there is a narrow ledge before a dropoff. If we stay on the ledge, we can peer around the wall to see a Ygnĺoml guarding a 2x shield recharger, and we can jump across to that. From there we can look around to see a similar ledge with -something- interactable, across a divide we canĺt jump. Conveniently the area is symmetrical to a degree, and there is a lift just to the right of the other ledge, from this perspective. Riding it up one level to a similar purple ledge, we can jump across to find that it was a switch up there that was interactable, and interact with it we do! The terminal is in the room just below this ledge. If we donĺt follow the directions at the start, and come straight here, the terminal on the right is active and tells us that we need to go back, complete with directions and their not so effective 3d representation.
However, if we do hit those first switches before coming here, the terminal on the right is disabled and the one on the left is revealed, which tells us we have just hit the switch on the ledge behind us ů even if we havenĺt actually done that yet. It also gives us the next set of instructions. Oddly it describes how to get to the switch it just told us we had already hit, but hey, thatĺs useful. It references that data integration tower switch I already guided us to, and says that another is down a level on that lift we rode up to the switch behind us, so weĺll have to check that out! It starts repeating information a bit, as that tower switch is the same one it gives us a map to on the next page. What weĺll do is go down that lift, hit the tower switch, then ride that same lift to the top and make our way to the second control switch enabler, and then weĺll deal with the later stuff from this terminal.
So yeah, as described, the lift now to the left as we leave this room ľ and we ride it down one level and head west-northwest. And sure enough, we find the tower switch, and this time it is even for the tower in front of us ľ so generous! But we donĺt want to jump off here, we want to turn around, shoot the Ygnĺoml and Drones that have probably joined us, and then ride that lift right to the top and head north into a bright white and grey area. There are a couple of corridors that end in straight leaps of faith down to the bottom level, but if we go out to the north and then left, we gain entrance to the data integration tower area from the highest point! The map in the terminal put the next switch between the bottom two towers, so we can work our way down, around to the right from this vantage point, being careful not to slip off, and then hard around to the left down the next shaft, and into the switch corridor. Here we actually get an idea of what weĺre doing here, as there is a window to the south that reveals an area sealing off when we hit the switch ľ there is quite a bit of inaccessible space in the level into the bargain! And now we can drop down the towers and head to the life support area, as we will probably need oxygen, and a Pattern Buffer never hurts! Okay so we have a map location for the third control switch enabler, and we know it is to the southeast. Well, there is a lift down there ľ if we head out past the central lift and east into the lower ring again, we can take a right into the outer ring. Around to the east a bit we find a lift in the south wall. This is another part that is made to be confusing ľ these lifts have just too many dropoff points and when they face the same way it is just mean. Here we want to go right to the TOP, exiting east, not to be confused with not quite the top, exiting east, as I did at least twice. The top level takes us to the switch we want to hit, and this starts several platforms dropping down in the wall. If we just go down on top of the far right one, we wind up on the right level and can just strafe left to see our next switch. But the map makes it look like we can access that room from another area with that same blue barbed wire wall texture, which we cannot! Next we will go to the control switch associated with the second enabler. That is back up by the most recent terminal, and a recharge on our shields and oxygen wonĺt go amiss either! Up in that area if we head out to the northeast past the narrow pillars that characterise that room on the map, we enter another bloody ring, which runs around the extent of the level right on top of the others we know so well, and makes it all the harder to find our way around, and harder to remember where things are when we are not following directions. The strict ordering of some of the switches is the main issue. We turn right going into that ring and run around to the south of the level, where we find stairs going up. These lead us to the room described in the terminal, our next switch, and another terminal at last! It is quite convenient that Frĺkna numbers his terminals, as we can also access #4 at this point, but letĺs not do that just yet.
It is a bit strange how Frĺkna keeps repeating things we already know in these terminals, but they are accessible without hitting the switches so I guess it is intended to help. I fear it might have the opposite effect if you cannot find the necessary switches though. Especially as it is so difficult to find your way back to the very start. Anyway, besides the news, there is little we donĺt already know in here, and we can jump back out into this purple ring and carry on to the next switch. Heading further around to the right, we eventually find double doors in the right wall, and open them. We are greeted by another terminal, and there is a switch further in but it is up on a raised platform. We can hit it with fusion or a shotgun, but if you happen to find yourself here without ammo for such, access is rather obscure: if you head south from the very top of the run of the ôcentral liftö ľ the first thing we enabled here but hardly central to our adventures since ľ you find yourself at the right height and can jump across to a ledge that leads to that switch, and to an oxygen charger on the way: cheeky! I had to update the map as I found out during this writeup.
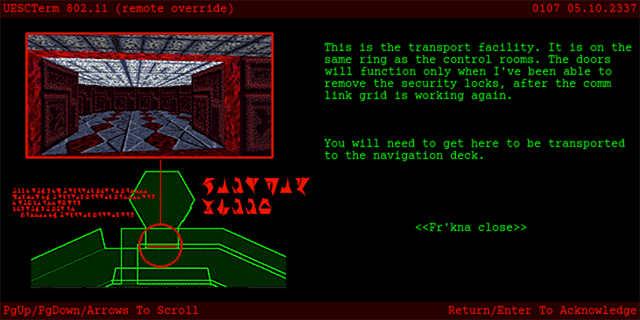
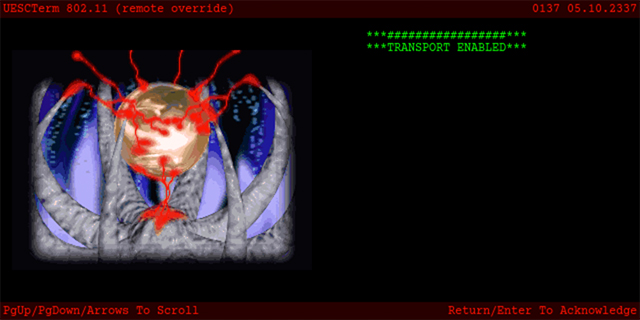
The terminal has quite a nice trimmed map image highlighting all of the switches yet again, and it gives us our final steps here: hit one more switch that we have revealed back in the life support area ľ which is convenient yet again for oxygen and saving, and then get to the transport facility, which is really near where we are right now. Just back out on the purple ring, around to the right once more ľ the door was previously locked but is now open to the elements and reveals one final Hunter in our way. And the final terminal. It tells us that we have been successful, but Frĺkna still has not been able to contact the Ygnĺoml on the navigation deck as he had wanted to. So weĺre going there so that everything does not go BOOM!
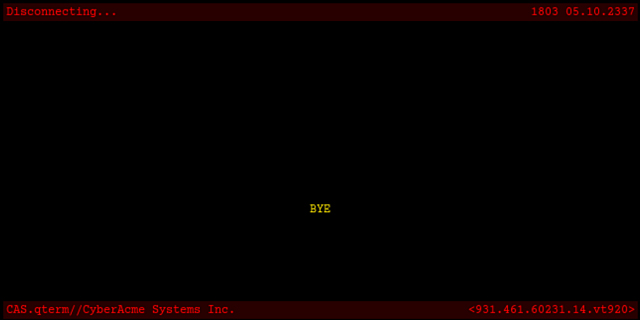
But wait! We still have the mystery of getting back to the start of this level. That is easiest via the central lift as well, again riding it to the top and heading southwest. That takes us right to the lift we went up at the start to get to the central lift in the first place! We ride it to the top and head east-northeast, to the shaft we dropped down at the start, and happily, higher up. We fall strategically around to the left and find probably some enemies, but more importantly a revealed teleporter. This takes us to the disconnected room top-right on the map. There are some drones and cyborgs, the only ones on this level, and as we move through the room, more cyborgs, and in our favour, 8 shotgun shells and 8 fusion batteries ľ really handy for earlier in this level, so donĺt leave it this late in your plays :). And thereĺs a bloody terminal, which I also only realised during this writeup, so I had to update the map, and send PS more terminal pics! And here it is.
No I didnĺt use a Map Editor, per se; I used another guyĺs writeup: props as always to Kevin Jaques at http://www.hierlaw/com/MarathonDIABD.shtml ľ that guy gives a lot more play by play detail for the level with supporting pics. I think weĺve done a good job of sussing the level between us :). See you on the Navigation Deck. Or starside - whichever comes first!
| ||
|
| Replies: |
| Tour of Duty ľ Sensori OverLord | Martin | 5/29/18 12:45 p.m. | |
| Re: Tour of Duty ľ Sensori OverLord | General-RADIX | 5/29/18 3:32 p.m. | |
| Re: Tour of Duty ľ Sensori OverLord | PerseusSpartacus | 5/30/18 6:27 p.m. | |
| Re: Tour of Duty ľ Sensori OverLord | Martin | 5/30/18 7:12 p.m. | |
| Re: Tour of Duty ľ Sensori OverLord | PerseusSpartacus | 5/31/18 8:06 a.m. | |
| Re: Tour of Duty ľ Sensori OverLord | Nevets01 | 6/1/18 10:11 a.m. | |
| Re: Tour of Duty ľ Sensori OverLord | VikingBoyBilly | 5/31/18 2:30 p.m. | |
| Re: Tour of Duty ľ Sensori OverLord | Martin | 5/31/18 3:33 p.m. |
|
Problems? Suggestions? Comments? Email maintainer@bungie.org Marathon's Story Forum is maintained with WebBBS 5.12. |