/-/S'pht-Translator-Active/-/
|
|
/-/S'pht-Translator-Active/-/ |
| Tour of Duty DiaBD: Hostage | ||
| Posted By: Martin | Date: 6/28/17 11:28 p.m. | |
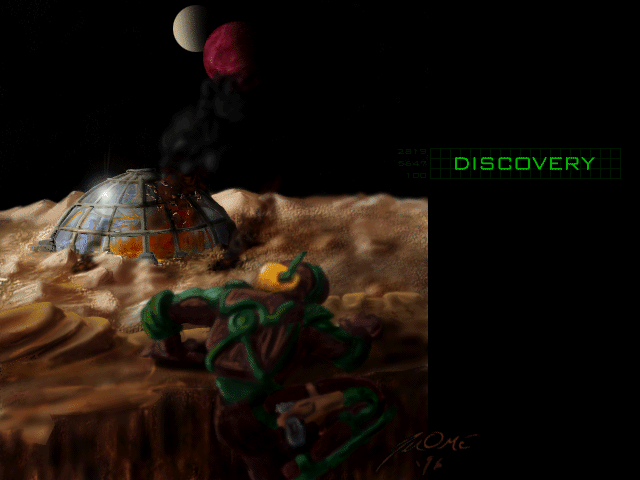
 We start off with a nice chapter screen that paints a rather remote and primitive picture of where we’re headed. The title “Discovery” adds to that feeling as well, as does the silence that accompanies it. I figure that’s us in the foreground, although it also looks kind of like a Trooper, and it is not at all clear how we’re getting in to this place!
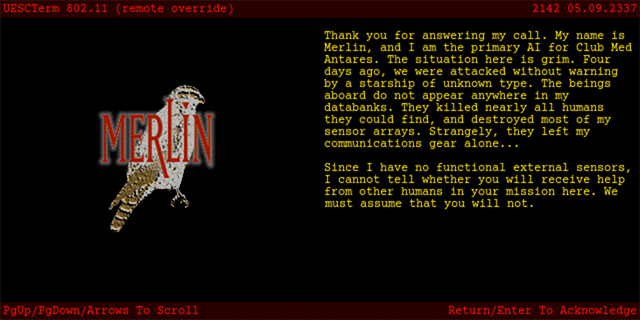
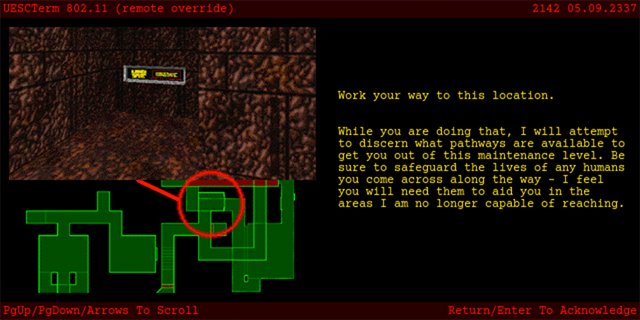
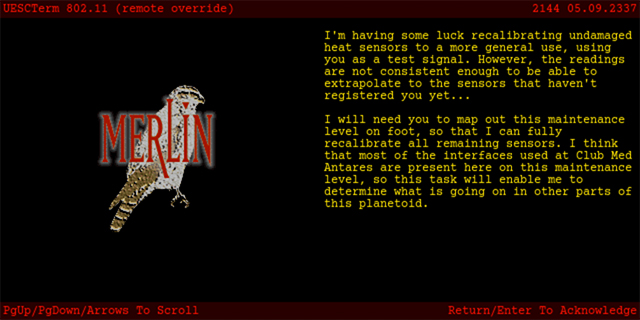
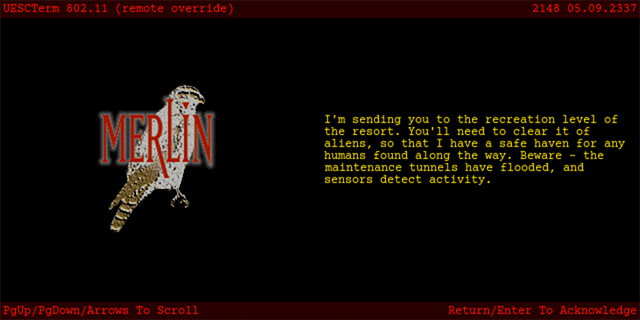
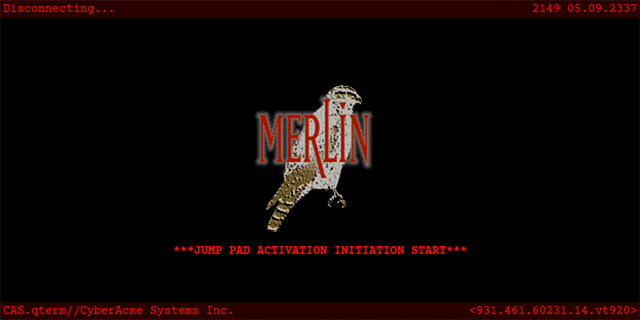
Well as it happens, we arrive in a small room that is open to the sky above, perhaps that very domed room from above, but it didn’t look open! We are facing a terminal, and within it we are introduced to Merlin, the primary AI for Club Med Antares, and I guess a name that relates to Excalibur, the next scenario in the same universe. The name of the club makes me think of outdoor spas and beachside huts, but unless the lava we see on this level is just hot water, the reality is not at all the same. Also here the lights are flickering and there is an explosion like ambient loop.
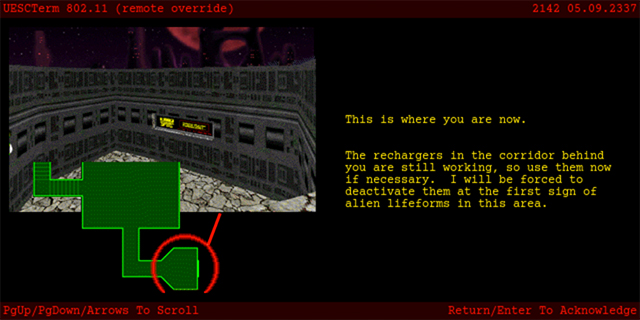
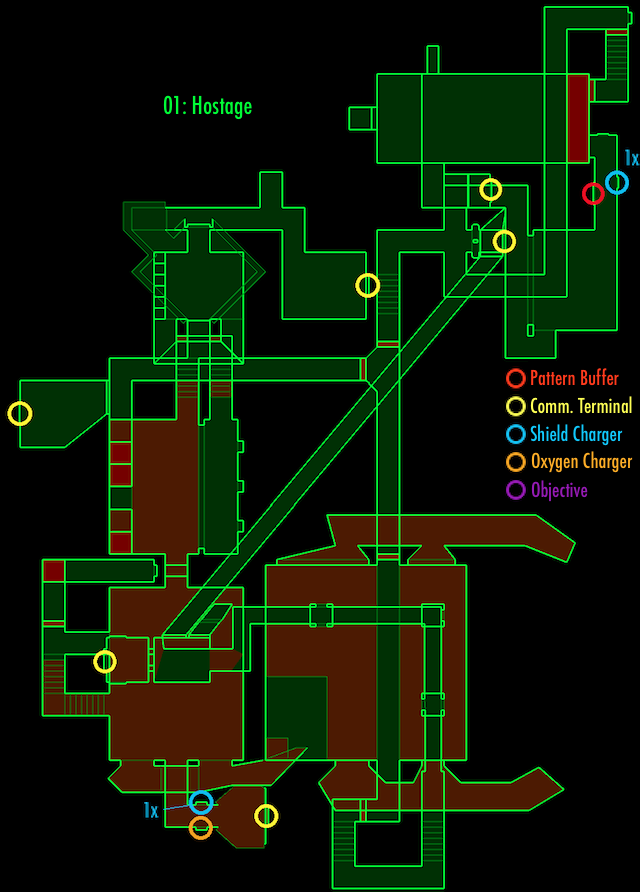
There was an attack here recently … sounds pretty standard Marathon fare! And the terminal proceeds in an informative style not dissimilar to Leela’s, which is not too surprising given the scenario’s early inception and that being the main style example they had. There are other humans about but Merlin is not sure if they’ll be of much use. As it turns out, this scenario makes more interesting use of them than most! As for what could go wrong, as I asked at the end last time, well Merlin clearly doesn’t know how we roll, as he says he’ll turn OFF the nearby rechargers when we encounter the aliens … oh great! It does make this level a right pain on TC, but I’m not -on- TC for this. They are indeed nearby anyway, both 1x shields and oxygen, to recover from that weird vacuum start. The aliens are -right there- in the next room, so breathe deeply! It’s a nice open space with just some Fighters to start with – easiest if I still call them that I think, without trying to explain Pirates and Galaxans. There are a couple of low openings down to the lava pools I mentioned, and the odd Lava F’lickta down there trying to take pot shots at us! There are also some rock structures on the floor that I believe we last saw up in the air on the Electric Sheep levels. The door out of the room is mostly closed, but closed from the bottom rather than the top, so not quite a reference to that so well-known door from Arrival. We have to ascend a staircase to the side, go through a door and down a lift, kill another Fighter, and hit a switch to continue here. When we do, it is into a room reminiscent of one of those platform puzzles from Defend THIS, and stairs at the end of the room lead up to much the same switches. The stairs have a nice cycling light going up them, which looks very inviting. I think you can go wrong here, but hitting the switches in the order you come to them, reasonably quickly, seems to work just fine, kind of as it did in the original. As long as the two lifts nearest where you entered are not perfectly out of sync, you're fine. There’s also a little ammo up there. Past the platforms we come to a long corridor, which ends in a Fighter in front of a locked door. There is a switch, or half a switch, on the wall to its right, but it is not working. Back down the corridor there is a side passage to a square room and then another corridor, and then we get Fighters and a Compiler spawning. The square room has a couple of high up cubby holes for enemy ambushes, something that this scenario does a lot, again I guess because of its pre-Marathon 2 original creation. The maps also have real oddities, like this room appears to have separate square polygons down one side, and a rotated square is overlaid on it, but to no effect in practice – take a look.
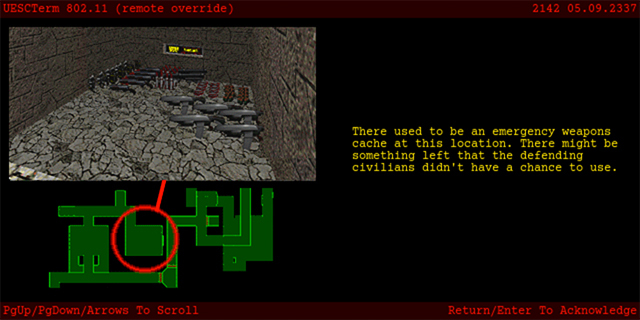
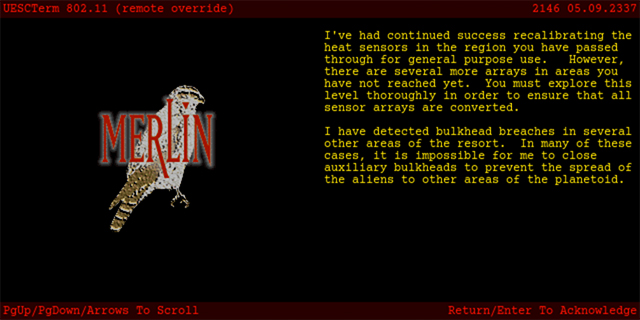
Possibly tricks to get enemies to wake up at certain times? A lot of them were changed to teleporting in with the M2 remake here, but I guess some of those artifacts remained. Also interesting is that that stuff is not shown on the terminal pictures involving the map. But they stopped using actual map data in M2 if I recall. Anyway, now if we try to head back the way we came, not only are those rechargers disabled, but the whole area up to the platform puzzle is flooded with lava, as you can also see from the map. Lovely. So instead, on down the next corridor. It leads to a bit more ammo, and then what remains of the cache Merlin promised us, which happily includes an assault rifle. In another terminal here he tells us that he might be able to get more information soon based on sensor recalibrations … again somehow a familiar story, as if from an old dream.
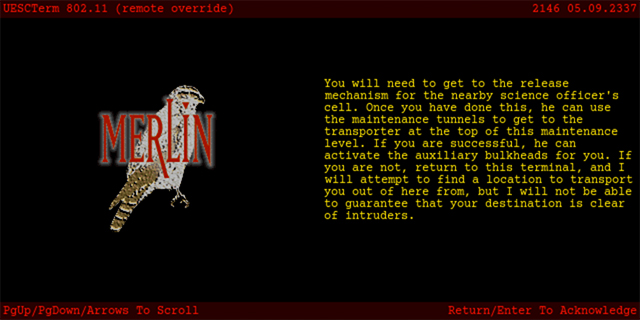
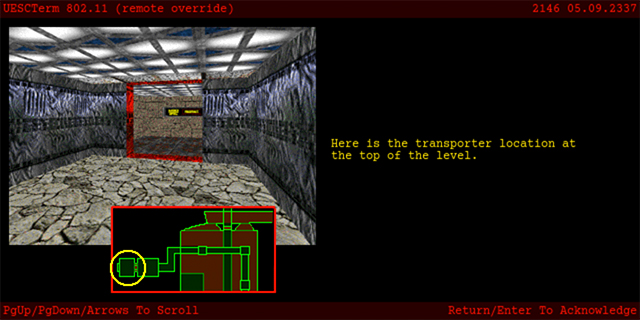
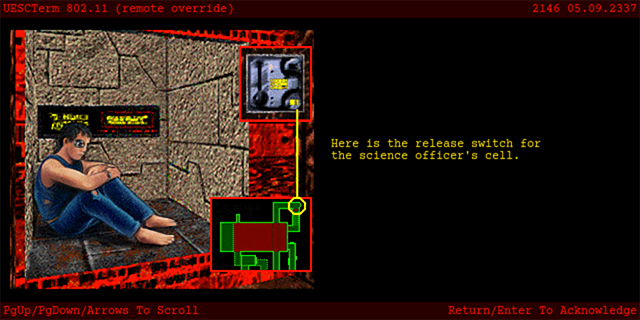
And magically, going in there enables the switch for that door just earlier. It leads us to an intersection – to the right is a door through to the lava pools area, and the ultimate end of the level. To the left is a door down to where we’re headed more immediately. There is also some ammo here, and a single Fighter. Through the left door, down the stairs and around the corner, we see a BoB in front of a terminal. He is confined behind a curious lava forcefield – if we approach it we get thrown back and maybe injured. Best avoided seeing as we still have not saved! To the left is another terminal, the one Merlin told us to head for.
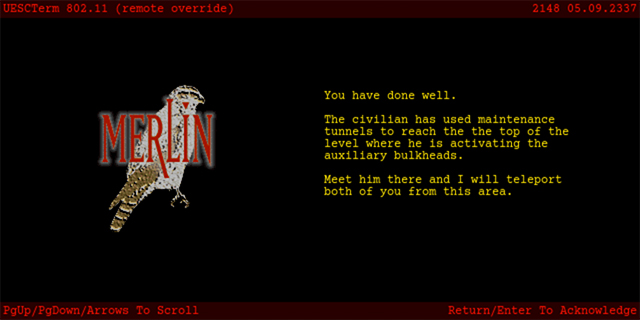
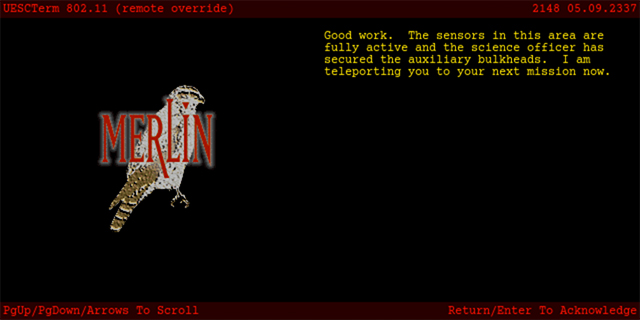
He has been having success with some of the sensor recalibrations but we need to keep exploring, and he’s trying to confine our alien friends to certain areas but that’s tricky as well – makes me think of the flooding chambers of the Titanic, but being overrun by aliens is not as bad as being filled with water, not when we’re around! Also here we get mention of the role of our nearby BoB friend, and he does indeed end up using a secret map corridor, quite visible in the pic earlier, to get across the map remarkably quickly, a very cool effect. Interesting is that Merlin also gives us the option of failure! I’m not sure how that was intended to play out, but this level does indeed have a secret exit terminal. On from here back past the BoB cell, we fall down a hole – I’m not sure if it could be grenaded across!* Down in it we find a recessed switch that we are forced to grenade, and that sets some lifts in motion, including dropping our current platform down (the rabbit hole?). We soon hear the sounds of Pfhor, and then see them, on a platform next to us. If we get on there with them, we can find a little more ammo, and thanks to that all polygons map, a secret door behind which more ammo and a 2x shield canister! Heading back to where we fell down, we find we cannot get to that longitude – so that bit of ground must have gone up when we went down. Interesting! Of course we do have another way to proceed, just opposite where our switch hole is now way up on the wall. This takes us past the sound of Pfhor teleporting in in a pit below, and some right in front of us, and then we are forced to fall down into the pit as well. It’s quite dark but holds no secrets. It does lead us to our first pattern buffer, and a 1x recharger, so it’s all good in my book! There’s also a switch, and mapwise we are very close to where we fell down earlier on. This has been a lot of effort to get not very far, but it is getting us closer to that switch to release the BoB. The switch activates a lift just past here, right next to the polygon where we first fell down. Then we have a set of stairs and a door, and then that switch. And then, rather elegantly, we pop back out exactly the same spot where we first fell down. Slightly less elegantly, we can no longer get down to the pattern buffer and 1x recharger. Hitting the switch does several things: it opens the BoB cell from our side, sets the BoB in motion through the door only he can access (you can watch him run on the map), turns on an alarm ambient sound in the cell area, blocks off the terminal that told us to find the switch, and opens the door to the secret exit terminal way back near the start, before the lava blocks our progress. That’s a lot of responsibility for one little switch! One of the other earlier terminals was deactivated by some earlier action. *Well I wasn't sure if the gap could be grenaded across, so I tried when I was all but finished this writeup, and it can indeed! This takes you straight to the switch to open the BoB cell, without having to go through all that annoyance, but it means the switch doesn't perform all of its intended functions. The door does not open for BoB so when you go back, he is just standing there, and you can kill him, leading to forced failure so I guess that's how you do it. The terminal still says you've succeeded of course, but what does it know! You can actually still read the other terminal nearby, even through the barrier that is now in place :). Back to normal progression, the terminal in the cell congratulates us on a job well done and tells us to meet BoB up where he has opened the bulkheads to our exit terminal.
The secret exit terminal berates us for not following instructions, and says we’ll have to take our chances on the recreation level. The level it takes us to is identical to the one we’re going to anyway, except for a lack of pattern buffer and recharger. I see no point in going through it for the tour, except that I will acknowledge its name, both because it is interesting in context and because PS made a header for it!
For the normal exit terminal, we take that right hand door we could have taken much earlier – but we wouldn’t have been able to access the final terminal room without BoB. On the way we take a bridge over the lava pools reminiscent of What about BoB? and are taunted by Fighters on another platform just out of the lava, more like Two Times Two Equals. If we respond to the taunting and go over to join them, we get a little shotgun ammo, but no shotgun, and a seriously rude awakening in the form of about 9 Compilers right in front of us. This can be a problem and is really not worth it unless I’m missing something. A separated hole into the lava in the corner appears to offer no rewards at all, which is a bit disappointing, not that you can really have enough shields to spend any time down there anyway. And of course that was another reason to delay coming this way – it’s quicker to come from the pattern buffer than from the start of the level :). On through the door at the end of the bridge over the lava, we go up some stairs, turn a few corners and kill a couple of Fighters, and meet up with BoB again. He has opened up the door to the final terminal and there is nothing else left for us to do but read it.
Curiously this success terminal gives us much less information about our next mission than the secret “failure” exit terminal, but we are blessed with the full gamut. There are also two circuits on the walls here, but smashing them doesn’t seem to achieve anything. The old walkthrough I’ve been consulting suggests much the same. Useful document that :). In fact I’ve just read of something later on that I missed, on one of the most frustrating levels ever, Sensori OverLord – that’ll be a hell of a writeup! But there’s plenty to get through in the meantime.
| ||
|
| Replies: |
| Tour of Duty DiaBD: Hostage | Martin | 6/28/17 11:28 p.m. | |
| Re: Tour of Duty DiaBD: Hostage | General-RADIX | 6/29/17 12:25 a.m. | |
| Re: Tour of Duty DiaBD: Hostage | Yossarian | 6/29/17 4:15 p.m. | |
| Re: Tour of Duty DiaBD: Hostage | Hokuto | 7/3/17 8:14 a.m. |
|
Problems? Suggestions? Comments? Email maintainer@bungie.org Marathon's Story Forum is maintained with WebBBS 5.12. |