/-/S'pht-Translator-Active/-/
|
|
/-/S'pht-Translator-Active/-/ |
| Tour of Duty - The Hard Stuff Rules... | ||
| Posted By: Martin | Date: 9/15/13 10:44 p.m. | |
|
11 – The Hard Stuff Rules... The name. The Story page for what’s in a name covers it well: Yet another Beavis and Butthead reference.
Rodrigo GirGirăoo [sic] writes:
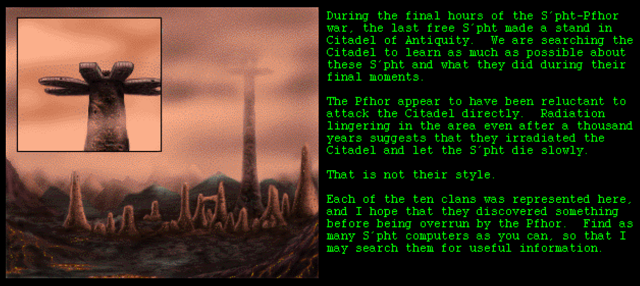
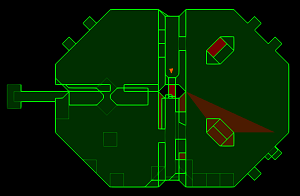
One source for the name itself, the other, straight from the horse’s mouth, as to why it was so named. No further mystery! As I alluded to last time, although that’s ages ago now, this one takes map overlap to a new level, if you’ll excuse the pun. I can fully understand Greg’s story – the fact that developers, moviemakers and graphic designers got the work done that they did in those days on that hardware always amazes me. Especially considering that the LC III that we had at home at the time couldn’t even run M2, and was purchased in 1994. ... Last time on Tour of Duty we learnt that a darkened section of wall can conceal all manner of bountiful things! This is the only level I can think of where missing something like that makes things so much harder – well, there’s the switch on KYT but that’s only for a Pattern Buffer, and it’s such an awesome level that one should want to have to start again many times :). Anyway, we met compilers en masse, explored some quite complex structures, found that we could take multiple approaches to some areas, and eventually found another fusion pistol, and a somewhat secret shotgun in an area drained of lava – also apparently a couple of other weapons, but I’ve never seen those myself! We got berated by Durandal for hanging around, and ultimately entered the Citadel of Antiquity. Durandal then said he would teleport us to the higher levels of the Citadel to search for more information on the S’pht clans and what happened to them, and especially the eleventh, during the S’pht-Pfhor conflict. This level has us climb up several further levels, and the automap is much less useful than normal. Let’s have a look:
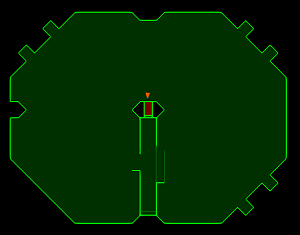
Another absolute work of art, but the problems are obvious. It’s no use at all for trying to remember how the level goes, as most of it is in a massive jumble, with only the three wings that we explore later on in the level separately visible. Let’s see if we can’t do a bit better. We start in a little hidey hole – one of many in the early rooms on this level, and it was pointed out in Volunteers that they are similar to the final room of Eat It, Vid Boi! Sensible as we are going up the tower, and they actually make sense, to a point, when we look at the image of the tower in the Terminals. Actually the whole structure of this level does – the three wings at the top are clearly visible in the pictures. We step out into a courtyard filled with sleeping F’lickta. The ones in this first room actually won’t wake up unless you get right up close and personal with them. Handy! There are also several Ticks around, in the same state. The ambient sound is what I described on What About Bob? as repeatedly trying to start a car. Exploring the room, we ultimately find a way out: an opening in the structure in the middle, which lifts us up to a corridor, which ends with a Terminal and a small amount of ammo, with a window out to the left to where will soon get to. As we head into the lift, the car sound mixes with my definitive mechanical sound, and quite the chorus they create. Then as we move on, the sounds seem to take turns in different rooms. Exploring only this first floor, you can actually see things quite well – in my first map image below:
One would be hard pressed to see that room on the overall map, to the point that I’m not even sure where that Terminal is on it – okay I think you can just see half of it, about a centimetre up from the End one. This first Terminal has some interesting history:
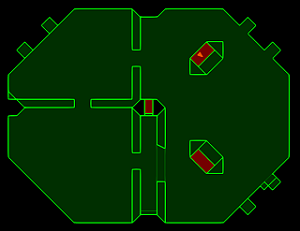
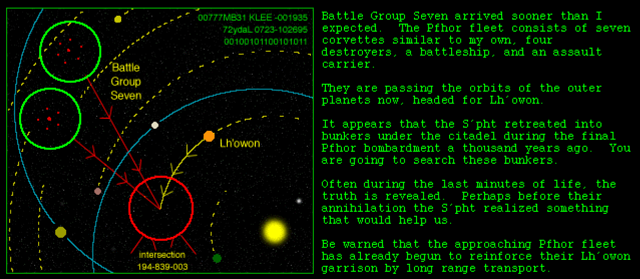
So, the Pfhor didn’t attack this place with force, but with chemical warfare. Did they perhaps have some issue with taking out a place of cultural significance? Something in their own boring religion? Nothing more on the progress of Battle Group Seven yet. Well anyway, our search for yellow text continues (and hopefully no more of that sneaky blue stuff from the previous level!). An opening from this corridor leads us to another open area, with more F’lickta, if we hadn’t already woken them up along the way – I guess they don't mind the lingering radiation ... and neither do we! This floor is divided into four parts, including the initial corridor. We can see the walls in the next map image:
Most of the rest of the floor matches the one below. In the area next to the corridor, we see a raised bright red square area over a bright blue floor texture – like a teleporter for tiny people. The next room has one as well, and something more interesting: as we leave it, a large amount of ammo appears in the corner behind, along with a 2x recharge canister! The final room on this floor has not one but two lifts leading further up ... don’t worry, I won’t say it! This time we arrive at a room with a Pattern Buffer, yay. But first, we have our first encounter with the Lava F’lickta outside of that demonstration on Slings & Arrows, and our first encounter with the Water F’lickta – these soak up much more damage than the Sewer F’lickta, as I guess we’ll call them, but they don’t have any projectile attack, just the slaps. Here there are a few barred windows through to the next room, and in the corner, a series of box platforms, via which we can climb up and jump out an open window. It’s not that straightforward though, as the boxes are not in ascending order! We have to go from the middle one to the first one and then run across to the last. Through the window, there are a few Ticks and F’lickta running around at ground level, and a series of raised platforms around the place. If we run between the raised platforms, we end up on a viewing platform outside the main tower structure, at point B on PS’s map, which nets us a Fusion Pistol, some ammo, and a wonderful view, if it weren’t for the S’pht bars on the window.
We have generally been looking up at the Lh’owon sky – now we see the red landscape as well! When we can pull ourselves away, we should head back to the Pattern Buffer, as once we jump down from the raised platforms, we can’t really get back there. We do find a 1x charger down here, which is very handy for what is to come, but it’s no PB. Anyway, once again we can get some idea of how this level looks, below:
Next, we're going up again, on a huge lift! Approaching it causes some of the lava in the room above to spill onto the map view – very odd the rules governing the map! Are those polygon boundaries where they do appear? We rise up to find ourselves looking out at lava pools. As was said in Volunteers, what is lava doing up here? The S’pht Citadel is presumably a built structure, so why add lava? Maybe an effect of the chemical weapons used by the Pfhor? There are raised platforms around the edges of the lava, with Sewer F’lickta, and plenty of Lava F’lickta in their natural environment. The lava pools go right across this floor, and partially underneath the staircase that is our next path. We can kind of see that in my last map image, with me at the top of the staircase heading to the Terminal at the end:
I remember on my first playthrough on TC in the ’90s being much more afraid of this area than I needed to be – taking the lift back down several times and trying to coax F’lickta down as well – I think I might have been quite low on ammo at the time. In my most recent playthrough I just tore up the place, dropping F’lickta like flies, and eventually coaxing the lava ones up onto the platforms to make my job easier. With the area cleared, we follow the paths around the lava pools to the staircase, and follow it up to a Terminal as already mentioned. Its contents just the same as the first one for now. A couple of Cyborgs come towards us, a real pain in a narrow corridor! In fact, for much of the rest of this level there seem to be phantom Cyborg sounds and indicators on the scanner. Probably to do with all the overlap, and some of the indicators will be the Ticks, but whatever, it all certainly helps to create a watch-your-back atmosphere! These Cyborgs don’t follow us back down the stairs, so we can retreat and recharge, and even if we just step out briefly, the Cyborgs seem to really sprint out of there and out of sight! To the point that they don’t always even come back when we do, and with the layout of the level around here, I actually have no idea where they go! This time I ended up with a bunch of Sewer F’lickta coming down the corridor instead – don’t really remember that from before. From here, there is a path that leads around to behind the Terminal, where we look out barred windows at the view again – that is part of the problem with the map, as it extends beyond the walls in spots like this. Here we also see the base of the southern wing above, nice touch. There are also paths going back in the direction of the lava pools, to the left and right of the Terminal. This is where the geography around here gets really confusing – is there even 5d stuff going on? If we take a left at the Terminal, we find a lift around to the left again. We’ll leave that for now – there’s a corridor going on from here as well. At a corner we turn right and see ... another Terminal, second verse the same as the first! We can go around behind the Terminal and look out the window to see the base of the eastern wing above, nice touch. Around to the left we find a lift but we’ll leave that for now – there’s a corridor going on from here as well. Okay that last bit isn’t quite true, but I hope it served to describe the confusion this area leads to! On the east side we have to head back away from the terminal to find the path heading to the north, and a window looking out at its base. No Terminal there. The rest of this area consists of triangular rooms and odds and ends, and we ultimately find ourselves (starting) back at the southern Terminal. Now I’ll take us up the lift to the left from there, and use it to access the eastern wing. In the southern part we find a few Sewer F’lickta in a maze – or at least there are a lot of obstacles to go around. There is a window at one point, looking across the expanse to the northern part of the wing. At the extreme, we find a Pattern Buffer and a 2x charger! That’s why we came this way :). In the northern part of the wing we find another odd layout, a few more F’lickta, and a blatant deviation from the interior decorating – a narrow alley textured like the lifts we’ve been coming up, and netting us a few MA75-B magazines. Heading back towards the middle, we find ourselves at the top of the left lift from the eastern wing Terminal, and from there we have direct access to the northern wing. The first thing we find there is a S’pht terminal.
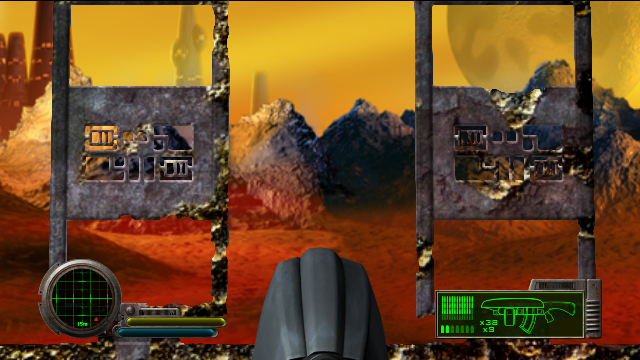
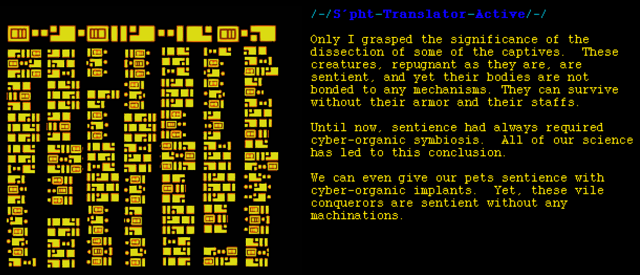
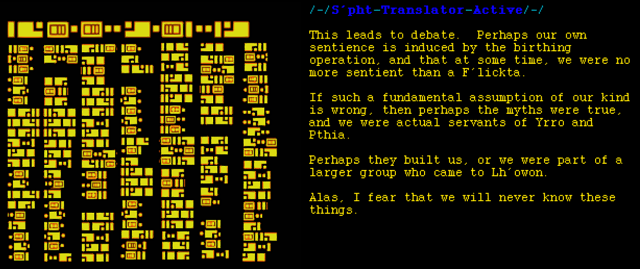
Here we have a S’pht talking about tests run on the invading Pfhor – they can survive without their armour and staffs, while S’pht have always relied on a link to machinery to give them sentience, give them life. The Pfhor invasion was a threat to the entire basis of their science, as well as their lives. The mention of ‘pets’ – does he mean F’lickta? Some pet! The poop throwing. Those teeth. And the only fetch I’d play with them would involve grenades! Anyway, if that is the case, this suggests they did make some smart F’lickta/Cyborg hybrid ... and I’m kind of glad we haven’t met that. Also around the concept of there being lava on the level, perhaps they wanted to provide an environment for their pets? It is quite something to think that this is basically a S’pht considering that their science might be incorrect, and, essentially, that their religion, their cultural beliefs, might be correct. I’m not quite sure what evidence the equivalent for humanity would require at this point, for a scientist, and I think that’s best not discussed here. There are obviously many things we do not understand ... and may never be able to :). The door just here opens in two parts, and reveals a few Cyborgs, in a room that appears to be some kind of S’pht test/display unit – a number of raised platforms, one with a stationary, levitating Sewer F’lickta, and we imagine a sort of force field, or just glass, around these display cases. I’m never sure if all of the platforms are supposed to have things on them – it is weird that some don’t, and keeps up the uneasy atmosphere, especially as in one of these rooms, one of the display F’lickta has a tendency to come to life! Heading to the western side of the northern wing, we come across a set of Cyborgs, including a red-back one with homing grenades – thankfully we haven’t seen too many of them! Again, I remember this being much scarier years ago, and having homing grenades chasing me all the way to the eastern wing. Whatever, they’re all dead now. In the western room, we find heaps of S’pht Terminals in one place, at point A on PS’s overall map – “It looks like a goddamn town meeting!”
On this side it looks like only one is working, but there are more here. We enter through a very narrow doorway, and just now on arrival I saw this great field of Tick corpses – is this normal? I blame the Cyborgs, but they would have had a tight squeeze with that entry! There is so much story stuff here in one hit that it is a bit overwhelming. I’ll go through one by one and see if I can’t bring my own brand of understanding to it all – I’ve already learnt things in this series that I hadn’t taken in even from Volunteers!
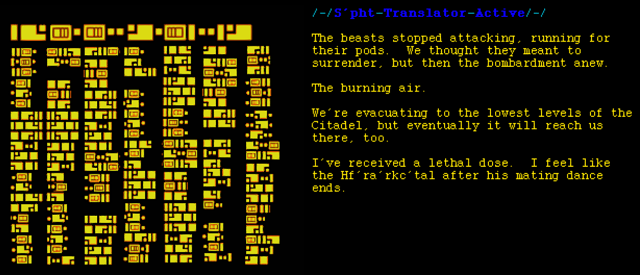
Essentially a confirmation of what Durandal told us earlier. The invading Pfhor were told that the chemical weapons were inbound, and headed for the hills, while the S'pht began to realise it was too late for them but were still intending to head for the cover of the lower levels of the Citadel. Sad stuff!
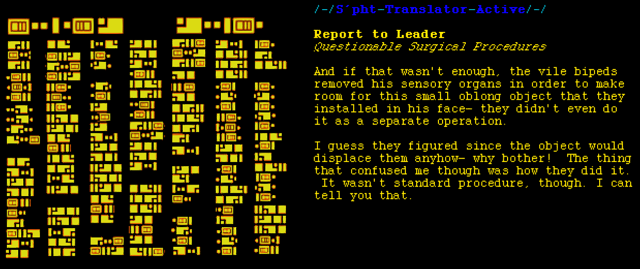
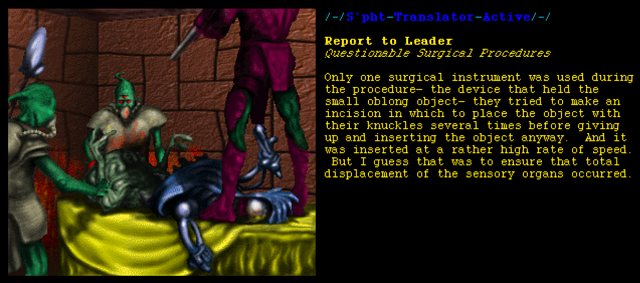
Is this documenting the procedure the Pfhor used to enslave the S’pht? Taking advantage of their normal mechanical links to help further their own ends, and turning them into the hostile compilers we know so well – allowing them access to the computer systems of whatever other race they wanted to wipe out. Clearly they saw no such benefits to be gained by enslaving humans – from humans they made only simulacrums ... totally expendable. Also, unusual that we have a different picture in a S’pht terminal!
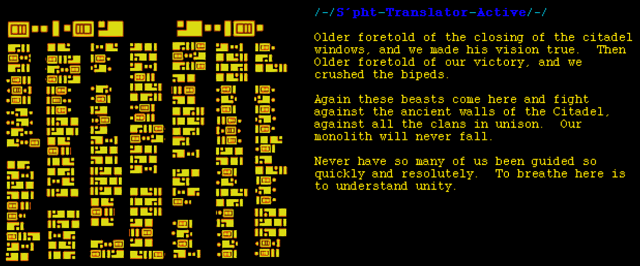
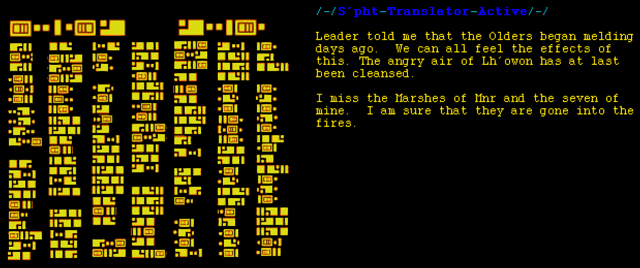
This suggests that the S’pht had held off the Pfhor, and in their minds permanently, previously – just earlier in that invasion? Or much longer ago? Or maybe they were different bipeds? No, the Pfhor couldn’t take this place by force, it was too great a fortification, and hence they resorted to chemical weapons, just as they ultimately resort to using the Trih Xeem. To breathe here is to understand unity. I’m guessing this is just before the gassing starts? Although the rest sounds like it has passed, with the angry air cleansed. I feel this is getting into the more hardcore stuff, with Olders melding. I couldn’t find discussion of this particular passage on the Story page, although naturally the S’pht terminals are dissected at some length there :), they just seem to skip this level – the Olders show up again next level, in addressing all the clans. Was this melding a defence against the radiation? It is heavily associated with the angry air being cleansed. The last paragraph identifies this S’pht as one of the S’pht’Mnr, and “the seven of mine” refers to family? Children? It is somewhat minimal sentiment/grief, but I guess one doesn’t write such things down; still, nice to see. Heading south we find a lift, our access point to the very top of the tower. A Cyborg lies in wait at the top, which can be a pain. This time I got him to come on to the lift and then he was frozen in place for the trip down :). Up the top we get to complete the picture, with a view of each wing in turn from above, with Cyborgs and ammo teleporting in at various points. Now to the southern wing! After saving in the east, we find that some 6 or 7 Cyborgs are waiting for us to the south. This really is Cyborg City. In fact the eastern side of this wing has little more to offer than Cyborgs. Well, there is the one window where we can look across to part of the eastern wing, but we’ve seen things more impressive than that! The western side of the southern wing is another S’pht test room, where we meet a Cyborg, and a Sewer F’lickta that seems to appear from nowhere, or wakes up off the testbed, as I mentioned earlier. Tucked into the western corner outside this test room is a stealthy Pattern Buffer, but the way we’ve come, we’re probably going to head back to the one with the 2x charger handy :). So, this level is the ultimate test for the newcomer – figuring out where the hell one is is an annoying task, and only in doing a complete guide like this do I feel that I have got a handle on the upper floors, especially around the dual terminal confusion and the mess of a map, so this was all worthwhile :). And hopefully the rampancy guys will find it all useful when they get this far! I assume we could have checked out of this level right after reading the S’pht Terminals, but we needed to do a proper exploration job, and I think we’ve done that now, and we deserve a pat on the back. Either of the south- and east-facing Terminals will take us out, and I’m guessing the very first one would too, but I just blew myself up several times trying to get back there, so I can’t say for sure.
So we’re going off to plumb the depths while Durandal readies for battle. Often during the last minutes of life, the truth is revealed. Perhaps before their annihilation the S’pht realized something that would help us. Indeed, and perhaps that line has some significance in Infinity as well, in the last minutes of Durandal’s life ... hmmm. Okay I’m in charge for the next two levels as well, and I haven’t done the writing for them yet. Must devote some time to that. I’m away all of October; maybe planes would be good places to prepare further writings! I’ll try to get those two up before then anyway.
| ||
|
| Replies: |
| Tour of Duty - The Hard Stuff Rules... | Martin | 9/15/13 10:44 p.m. | |
| Re: Tour of Duty - The Hard Stuff Rules... | treellama | 9/16/13 3:50 a.m. | |
| Re: Tour of Duty - The Hard Stuff Rules... | PerseusSpartacus | 9/16/13 4:00 a.m. | |
| Re: Tour of Duty - The Hard Stuff Rules... | PerseusSpartacus | 9/16/13 4:36 a.m. |
|
Problems? Suggestions? Comments? Email maintainer@bungie.org Marathon's Story Forum is maintained with WebBBS 5.12. |