/-/S'pht-Translator-Active/-/
|
|
/-/S'pht-Translator-Active/-/ |
| Tour of Duty - Ex Cathedra | ||
| Posted By: Martin | Date: 8/19/13 5:25 p.m. | |
|
That was close, almost wrote Sex Cathedra ... quite a different level methinks. 07 – Ex Cathedra Another new chapter:
A nice organic look, with stone walls in the back reminiscent of something like a Mayan temple. Is this what the Pfhor temple we’re about to enter really looks like, outside of the limitations of our textures? More pictures like that would be really cool! Presumably there are Troopers and F’lickta just up ahead – the overlaid BoB warcry fits really well. Actually, having just looked at the picture fullscreen again, that’s a trooper in the distance, bottom-right (didn’t recognise him in green!) and is it a F’lickta falling dead in front of us? The name. The Story page for What’s in a Name gives the most obvious ideas, in terms of how the words sound: Michael Hanson writes:
The level “Ex Cathedra” takes place within a Pfhor temple. The page for Latin in M2 goes further; I knew it was there somewhere, I remembered it, as if from an old dream: Out of the Easy-chair (Arm-chair).
While one meaning for “cathedra” is “an easy-chair or arm-chair (esp. for women)”. Michael's translation is more appropriate for this level. Then again maybe Bungie are trying to tell us something. ;-). Nice one Hamish, now if only Latin had a word for swivel chair :D. And easy-chair? What about total-carnage-chair? Reminds me of the World of Warcraft pod. Last time in Tour of Duty, we found a not-so-secret fusion pistol, albeit very near a rather secret secret, met the new look Hunter (no more howl), and a serious S’pht ambush. You should be told that they deliberately fight poorly, that they are constantly resisting their slavers. Well thank goodness for that! We also found a fun spot where the Pfhor and S’pht determinedly back away from the room with the pattern buffer, and we encountered more industrial ambient sounds, and the key to that secret I mentioned earlier. Finally we ran across a bridge, killed more Pfhor and hit some switches or destroyed a panel – Whatever You Please. In terms of the story, Durandal was sarcastic, Tycho was confirmed to be here with the Pfhor, simulacrums made real airlock technicians run around naked, and we found the first writings from Thoth, although we probably didn’t think much of it at the time. Now we find ourselves in the vicinity of a Pfhor temple of sorts, looking at a brightly lit staircase with three entry points separated by even more brightly lit columns – as far as the texture technology went back then, this seems appropriately decorative for a religious structure. Of course Tempus Irae later put them to shame, but that’s another story, and shall be told another time. In the background we have the wind and slight thunder ambient sound. Looking up, it’s still daylight. Heading up the stairs we see a terminal, but before we get to it, we get rudely ambushed by a Trooper behind one of the columns on the right. Ouch! Stopping to deal with this inconvenience (definitely not scratchstarting, Troopers freak me out for that) we also notice a mini pattern buffer on the opposite wall (does it store a smaller pattern? More advanced S’pht compression techniques?). Then we can head on to read the terminal:
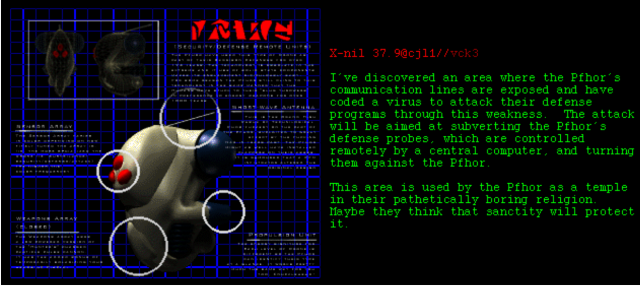
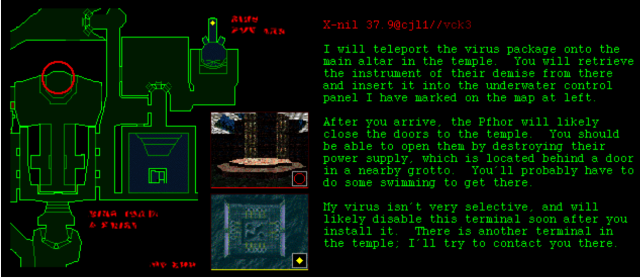
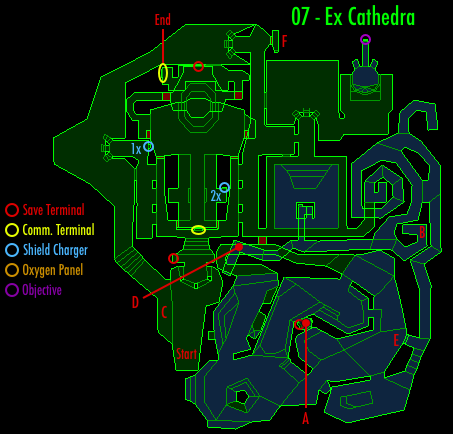
Another brilliantly instructive session with Durandal – a leader among AIs! So now he wants to turn the defence probes (I’ll still call them Drones) to our side – we have come a long way since Beware of Low-Flying Defence Drones! The Pfhor have a boring religion ... You don’t think I’m sarcastic do you? We have some detailed information about the Drones, but it’s very hard to read, and it doesn’t appear to have been covered on the Story page’s PICT text page. I’m not great at deciphering those things – just the section headings and a few other words here and there ><. At least we can officially call them Security/Defense Remote Units. Come to think of it, the fusion pistol had a similar shot in Slings & Arrows, but I’m not sure how much in that picture was even words! We also have a map of where we’re going to be picking up an uplink chip (which we remember from WW), and where we’re going to be putting it. Conveniently this map completely hides the water maze, and the whole wet area where we will first be going in order to reopen the doors to the temple. Let’s have a look at the whole thing.
Let’s start by exploring left from the terminal. We see a raised path, with structural posts along it, useful for cover in combat, and a window to outside on the far wall. As we head in that direction, we find a Drone and a Trooper there ready to wake up, and a small cache of ammo teleporting in, as well as another magnum! Well now, that’s more like it when we’re facing Troopers! Beyond them we find a 1x charger, which makes us feel much better – especially that first Trooper ambush can be really detrimental to our health if unexpected. On the way to this point, we probably noticed a couple of the doors into the temple, locked as expected. That Durandal is becoming so trustworthy :). Behind us as we recharge is another brightly lit three-pronged staircase, leading down out of the looser temple structure, and back into that nice green undergrowth. Also something strange going on with random? Drone spawning right here. Just hanging out charging and then just looking at the charger, I managed to get three further drones to spawn and come after me – this on a TC scratchstart was kind of annoying. I guess they decided they could teleport in while I had my back turned! Curiously, heading down the stairs behind does not invoke another ambush! We find ourselves with left and right options through the undergrowth (thinking back to the chapter screen, you dig?). The left path takes us peaceably along, and then up a staircase that leads us to a ledge at point C on the map, overlooking our start point and netting us some more ammo, plus an oxygen tank, which I believe we first encountered on Charon, but didn’t make much of a big deal about there. Well, the way I’ve taken us, we haven’t seen any water yet, but that will change soon. Anyway, I guess the tank is there in case we came here without recharging on We're Everywhere, as we do have quite a bit of water to get through on this level. Heading back down and taking the right path from before, we find a third brightly lit staircase! And we wake up another two Troopers standing guard – and now that I have that second magnum, that ain’t so bad on a scratchstart. In fact my favourite way of taking out Troopers, magnums from afar! To the right of the courtyard by this third staircase, there’s a window into what turns out to be the final room for the level, but it’s a bit high up! Then at the top of this staircase, we find the secret at point F on the map. The wall opens up to reveal a new style alien weapon, the first if we didn’t deviate on Medicine, and we still haven’t seen one actually attached to an Enforcer! Also here is a switch. A Labyrinth moment switch – I’m sure I quoted this earlier in ToD but I can’t quite remember where: Don’t go that way, never go that way! … Phew, if she had gone that way, she would have gone straight to that castle! That’s right, this switch takes away the need to complete the first part of our objective for the level, opening the doors to the temple without destroying the circuitry – apparently the Pfhor don’t realise, or they would just close the doors again! Coming back out of the secret area, we turn left and see a Trooper in the distance. The new alien weapon is happily far more accurate than the M1 one, and a long range ring of fire wakes him up. Passing a window on the left also wakes up a Drone and a Trooper or two outside – the Drone comes through the window but the Troopers just hang for the moment, possibly just landing some grenades on the window sill. Once we can carry on straight ahead, we find more temple entry doors, the other side of the inner temple from where we started our exploration, and a symmetrical ledge with columns, but with no 1x charger and no ammo cache. Rewinding to that window on the left, just after that we could also take another left turn. This is where we have no choice but to let loose chaos into this linear exploration attempt. A window to the right leads to the first sign of water on the level. A few Drones start blasting us, and we find ourselves dodging poop! That’s right, the F’lickta are back – I guess that really was one in the chapter screen! If we retreat, the F’lickta will even come at us from the back entrance to that water room. I’m going to go the other way first though, down the fourth brightly lit staircase! Dealing with the Troopers left (glued?) down there – quite a few of them actually, we find some more ammo porting in, and then a path carrying on to the right to (finally) a dead-end. Yet more Troopers and Drones guard a water pit. Looking at the map, we find that this is actually where we need to take our Uplink Chip ... but we have to get it first! Assuming we didn’t open the doors the cheap way, we now return to the pool room. In the middle of the pool is a structure. On the back of the structure is an opening. Inside the opening is a lift, but it is raised. We can see a switch down the bottom, but we can’t throw grenades in water :(! Disappointed, we climb back out of the pool, and look for another way forward. Heading around to the right, we find a path sneaking off in a new direction. This doesn’t go far before we reach water again! This is our first lengthy claustrophobic diving experience. S&A had bits and pieces, Charon had the rising sewage, Medicine had chaos, We’re Everywhere had large open sewage areas, but now we have a maze of sorts. Playing now I find the right path rather obvious, but there are enough dead-ends with F’lickta to fist that oxygen could become a problem for the inexperienced, although a few tanks teleport in, at least at point D on the map. First of all, a dive starting from this small waterhole makes me think of films like The Abyss, or 2012, or Alien: Resurrection, where they have people diving into small openings and staying underwater altogether too long with no obvious signs of where to resurface. Not fun. Thank goodness for our oxygen meter! After we jump in, there’s a little offshoot to the right, where a single Fusion Battery teleports in – handy seeing as we finally got a non-secret Fusion Pistol on We’re Everywhere! Into the maze proper, if we disobey the maze principle of holding onto the left hand wall, and hug the right instead, taking the inner loop, we eventually find ourselves at the bottom of the lift in the pool, where we can flick the switch and then have quick access back to the start of the level, to save and recharge I guess. Just beyond this, we find two oxygen tanks teleporting in, and a F’lickta to kill. Around the corner is a dead-end with what appears to be a spinning tap – providing a constant supply of water in this area? We’ll get used to seeing these. Backtracking a little bit, we find point B, where another F’lickta is guarding a 2x health canister! I had forgotten about that, and the significance of point B. Backtracking further in the maze and eating another path, we find a dead-end with only a F’lickta, designed only to waste our oxygen, and then the only path remaining, heading south to the far east of the map. Along a ways we find a little opening to the right, where a F’lickta stands guard over a secret door (point E on the map) into the open water we’re heading for either way. Engaging him wakes up several drones, which make their way down the stairs that were straight ahead, and into the water, significantly disadvantaging themselves – do we really want these guys on our side? There is also a current running throughout most of the maze, which means we actually have to pay attention when fighting F’lickta, in case our fists stop engaging and give them an opening. Heading up the stairs, we finally get our head above water again. There’s a platform in the middle of this space that we can get onto, but why bother? The window looking out just above water level is more interesting, revealing a wide open space with more deep water, and two Troopers shooting at us from a partially submerged ledge. Beyond them is the door that takes us to the circuitry we have to smash, at point A on the map, and an unmarked Pattern Buffer. If we head straight there, we will probably wake up a lot of Drones, making this a dangerous place to save. This whole wet area is quite overwhelming for the inexperienced. My approach these days is to first secure the next link back to the start of the level. Starting from the window, we jump out and try to get up onto the ledge around to the right of the Trooper. Following that on to the right, and through the opening to the left around the corner, we can take a flying leap through the next opening and reach a walkway on dry land, dodging Drones at every turn! Walking along here we find first an ammo cache and then, to our surprise, trigger an opening to the right, which leads back to the pool room! The Drones won’t follow us through here, so we can go back, save and recharge with impunity. The only other thing we have to do in the wet area is secure the room with the circuitry and smash it, but there is a lot of unused space in there as well, with the occasional Trooper on a platform. In the bottom middle of the map there is a column with stairs ascending around it, and there we can acquire a bit more ammo – still no magnum ammo though, scratchstarters, so those troopers are still going to be painful to the non-vidmaster! As I’m already at 2,500 words, I’ll go smash that circuitry and leave the rest of the wet area to your own exploration. Heading back to the start area we find the temple doors open, and Troopers waiting inside. The most obvious entrance leads us straight to the platform where the uplink chip teleports in, so now we can go and complete our objective, inserting that chip in the underwater tunnel we found ages ago. Then we come back to the temple. To the south we find more Troopers, some ammo and a 2x health recharger, yay. In the room where the uplink chip came in, there is a lift on each side. The one on the right yields only an ammo cache. The one on the left leads to another lift, which takes us -up- to a room with more Troopers, and a Pattern Buffer. Then a third lift, which is running constantly, goes between the final room at the bottom and a crushing death at the top. The final room contains a lot of Troopers. I remember its being even worse than it was in my last run through, but after a few ups and downs gradually clearing the room and returning to recharge, we can finally read the end terminal!
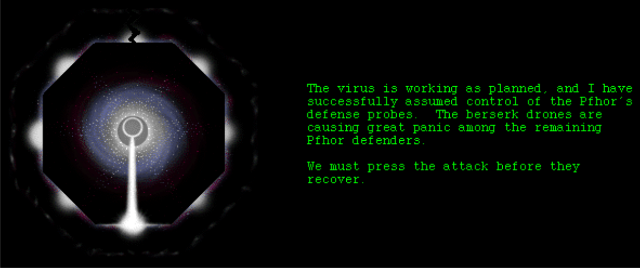
Short and to the point, unlike this writeup. Mission successful. We’ve now got some Drones on our side, and to be honest, that’s about the only thing that is clear about the next level. After the first room, it is all a mystery – good luck PS :).
| ||
|
| Replies: |
| Tour of Duty - Ex Cathedra | Martin | 8/19/13 5:25 p.m. | |
| Re: Tour of Duty - Ex Cathedra | PerseusSpartacus | 8/19/13 6:27 p.m. | |
| Re: Tour of Duty - Ex Cathedra | Martin | 8/19/13 6:37 p.m. | |
| Re: Tour of Duty - Ex Cathedra | Martin | 8/19/13 7:19 p.m. | |
| Re: Tour of Duty - Ex Cathedra | Hokuto | 8/20/13 1:16 a.m. | |
| Re: Tour of Duty - Ex Cathedra | Martin | 8/20/13 3:25 a.m. | |
| Re: Tour of Duty - Ex Cathedra | PerseusSpartacus | 8/20/13 7:30 a.m. | |
| Re: Tour of Duty - Ex Cathedra | Hokuto | 8/20/13 9:09 a.m. | |
| Re: Tour of Duty - Ex Cathedra | PerseusSpartacus | 8/19/13 8:00 p.m. | |
| Re: Tour of Duty - Ex Cathedra | PerseusSpartacus | 8/19/13 8:10 p.m. | |
| Re: Tour of Duty - Ex Cathedra | Martin | 8/19/13 8:18 p.m. | |
| Re: Tour of Duty - Ex Cathedra | PerseusSpartacus | 8/19/13 8:43 p.m. | |
| Re: Tour of Duty - Ex Cathedra | PerseusSpartacus | 8/20/13 8:08 a.m. | |
| Re: Tour of Duty - Ex Cathedra | Martin | 8/20/13 11:06 a.m. | |
| Re: Tour of Duty - Ex Cathedra | Godot | 8/20/13 1:21 p.m. | |
| Re: Tour of Duty - Ex Cathedra | Martin | 8/20/13 1:30 p.m. | |
| Re: Tour of Duty - Ex Cathedra | Godot | 8/20/13 1:40 p.m. | |
| Re: Tour of Duty - Ex Cathedra | Martin | 8/20/13 1:57 p.m. |
|
Problems? Suggestions? Comments? Email maintainer@bungie.org Marathon's Story Forum is maintained with WebBBS 5.12. |