/-/S'pht-Translator-Active/-/
|
|
/-/S'pht-Translator-Active/-/ |
| Tour of Duty: Med Lab | ||
| Posted By: Martin | Date: 4/16/18 11:39 p.m. | |
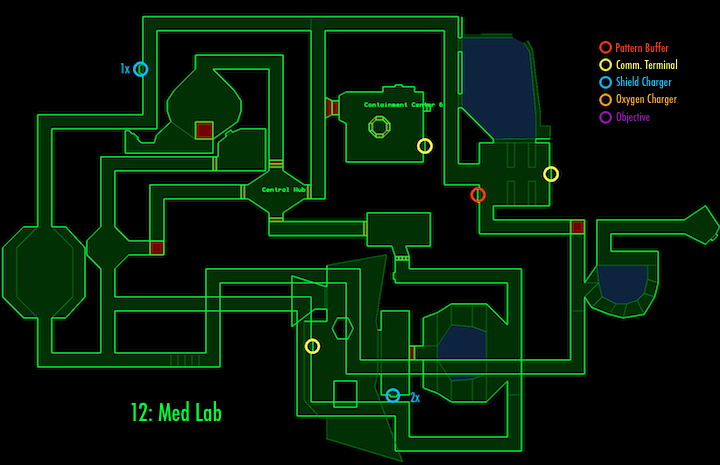
 Last time on Tour of Duty we kind of wasted our time, by most accounts. Apparently not reaching our intended destination, we ran around very M1-ish corridors and a whole maze with very little to recommend it. We finished on a random note from maybe a new AI or maybe just from dev boredom. Who knows? Anyway, it seems we are now back on track: this is Med Lab. We arrive to relative tranquility after that last fight on Free Falling, in long room with a 2x recharge panel and some calming water ambient sound. There's also a window, through which we see a a square pillar and a hexagonal one, with light pulsing over their textures, and a raised room beyond, although it doesn't look reachable. There's only one way out, a door opposite. This leads out to a nice light room with some Fighters that start coming towards us, up the stairs that go around the little water pool we heard earlier. Some F'lickta arrive in there, in no position to harm us. That 2x recharger was potentially redundant since I found the secret 3x at the end of the previous level, but either way, leaving that first room disables it, aww. We continue through a really wide opening into a corridor. To the right we are blocked by a quite astonishingly high wall, but there is definitely more corridor up there. This level goes to town on the height differential. The other way we also reach a dead-end, but there's a switch, and it opens up a wall for us, revealing a Hunter and a Trooper in the next room, somewhat surprisingly. Through another corridor and another door, we reach what the map refers to as the Central Hub. What looks like it could be a door to the north is not budging, but we can go east and west with impunity. From memory, east first makes more sense. Oh yeah, the map.
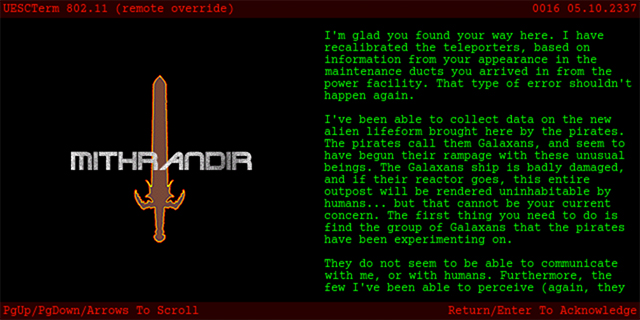
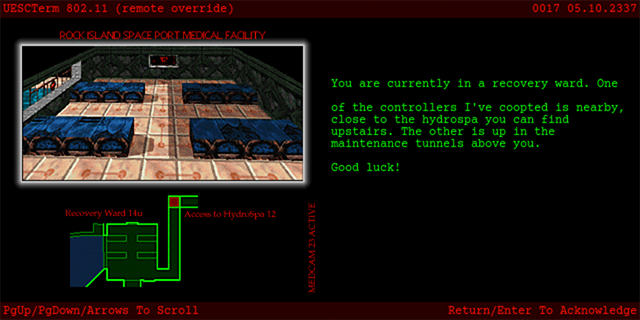
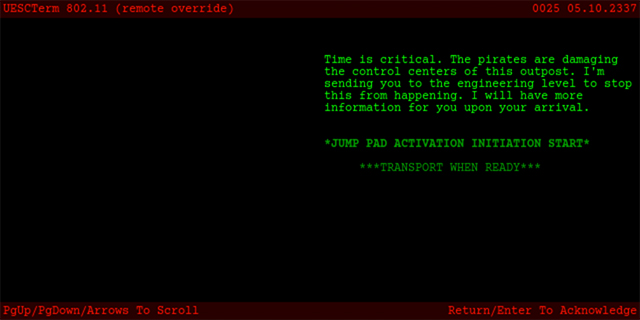
A pretty straightforward affair really, all corridors again, but not to a stupid mazey extent like the previous level. Through that east door we go past the entrance to Containment Center 6, but the door is totally hidden at this point so we don't even know it. At the turn, we again have an insurmountable climb to the left, so right we go. We get some glimpses of a nice Infinity Pool outside, and meet a lone Figher, before we come to our first terminal. We're back with Mithrandir, who kind of apologises for the last level, saying we arrived here from the Power Facility, and an error like that shouldn't happen again. He explains that the Pirates began their rampage with the Galaxans, which I briefly interpreted as "together with", but no, it is the Pfhor and the S'pht all over again. There is some fun stuff in there about the Galaxans not appearing on sensors properly - the invisible ones - and about their being hard to study because they just discorporate (nice word) when damaged enough. And they can't tell the difference between -us- and the Pirates, hence why they attack us, and we're supposed to try to reason with them! Mithrandir gives instructions that we need to get into the laboratory room for teleportation, and says he has coopted (another nice word) some controllers, presumably switches, including one by the hydrospa just upstairs ... this place really is relaxing! He doesn't mention the Pattern Buffer just opposite this terminal, which is just gravy, and quite unlike this scenario in general.
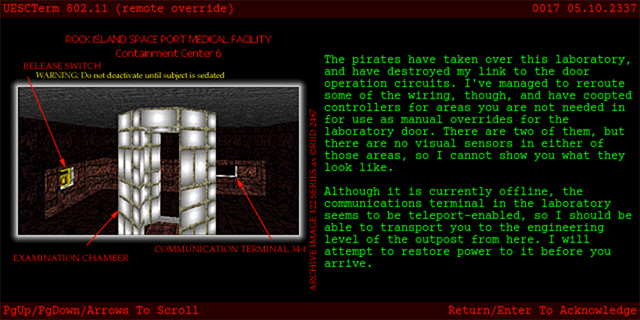
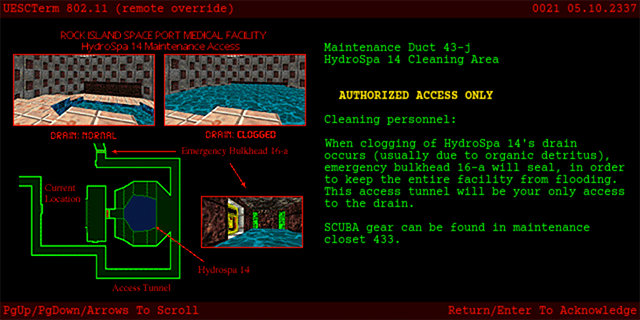
Around the corner we go up a lift to that hydrospa. Yet again we get meet a wall in the corridor and cannot go further that way, though. The map is quite interesting as it looks like these areas all connect, but that is -so- not the case. It is also odd because in some ways the level dictates a path, but in others less so. The hydrospa is down some stairs, and -of course- they bring an ambush, with Troopers and a Cyborg. There's nothing down in the actual spa, and it is a pain to climb out of - how was all this water represented in M1? And then along a short corridor we find the first coopted controller, and hit it. We have to backtrack all the way to the Central Hub, where we find we can now open the newly revealed actual door to the north. This leads us to a large dark room, with the telltale lit space of a lift towards the far side. It is not working, and a pesky Trooper grenades us from the raised area the lift would access, and even my 3x shields from last level are getting pretty low! So back we go, and then finally through the door to the west. Up a lift we are faced with a Hunter, and with another choice. We head to the right, let's say because it goes closer to where that lift is. The corridor doesn't go too far, and we open a door to find a Cyborg, and another switch. This one does indeed enable the lift to the north, and we go back there on a hunch. Umm, yeah I feel like what I remember from the last time I did this level certainly helps with the ordering of things ... and I'm okay with it :). When we go up the lift and hit the raised area, more Pirates port in behind us. We run along to hit the next switch before coming back to deal with them. I just jumped off and ran back down the corridor, and then found that the Pirates were at the top of the lift - ha! I headed back to save progress and found that Containment Center 6 was what had opened. Definitely saved before going in there. Two troopers are visible inside, along with a switch and a terminal. The switch opens the ... containment field, revealing stupid many S'pht. Thank goodness I have the difficulty down and maybe are they on easy mode like they were supposed to be in M2? Whatever, there definitely isn't any reasoning with them. The terminal just says we're not done yet. Ha! I guess we never captured that one the first time around. So we head back to the west and take the path not yet travelled. There is another intersection pretty soon, and I hesitate, only to find myself Huntered in the back and dead. TWICE. Third time I reversed down the corridor and sorted him out. If we turn at the intersection we find a terminal, which describes that that first pool we discovered can flood when its drain is clogged, and then this access tunnel is required for cleaning purposes, including a suggestion of where to find SCUBA (which I'm pretty sure I never even knew was an acronym; never seen it in caps before!) gear - I'm pretty sure it's all just for amusement; this map doesn't look to go in for secrets like its predecessors did. Our friend at http://www.hierlaw.com/MarathonDIABD.shtml reckons the inaccessible parts of the map are to add some noise to the overview as well as general flavour. Having said that, I just realised there was a little hidden cubby in Containment Field 6, but it only has a Fusion Pistol and one battery inside, no SCUBA gear :).
At the end of the access tunnel, where we would drop down to the very first pool, some Pirates port in as quite a jumpscare after the very quiet tunnel. Dammit curiousity! There's no point dropping down, so we go back to that intersection and head left. Left at the next intersection offers a very similar experience but without the terminal. It winds us up a the dropoff to the hydrospa, again with a Pirate ambush. It would be much more useful if there was a shield recharger down there. As it is, I really like the connectivity of the level, but it is all too short-lived to be of much value. The benefit is mainly in aesthetics, and it is a completely different style of map design from the next one I'll be writing up, the monstrosity of Sensori OverLord. The last possible way we can go leads to a large room packed with Fighters, and a couple of Troopers further down the corridor. I went back to make sure there was nothing up on the raised side areas ... sad. The very last little link up to our early exploration below comes with a 1x shield recharger! But the real surprise is the lack of a Pirate ambush! And, umm, that's all there is to this place. Returning to the terminal at Containment Field 6 we find we can now get the hell out of Dodge. So it was just a vanilla extermination level, and all the stuff about reasoning with Galaxans was a bit of a ruse. I guess playing in a different order would have made more sense. Never mind; a fun little level.
| ||
|
| Replies: |
| Tour of Duty: Med Lab | Martin | 4/16/18 11:39 p.m. | |
| Re: Tour of Duty: Med Lab | General-RADIX | 4/17/18 2:33 a.m. | |
| Re: Tour of Duty: Med Lab | VikingBoyBilly | 4/18/18 3:57 p.m. | |
| Re: Tour of Duty: Med Lab | Martin | 4/19/18 2:00 p.m. | |
| Re: Tour of Duty: Med Lab | VikingBoyBilly | 4/19/18 4:46 p.m. | |
| Re: Tour of Duty: Med Lab | PerseusSpartacus | 5/1/18 6:29 p.m. |
|
Problems? Suggestions? Comments? Email maintainer@bungie.org Marathon's Story Forum is maintained with WebBBS 5.12. |