/-/S'pht-Translator-Active/-/
|
|
/-/S'pht-Translator-Active/-/ |
| Tour of Duty - Feel the Noise | ||
| Posted By: Martin | Date: 12/18/13 1:26 a.m. | |
|
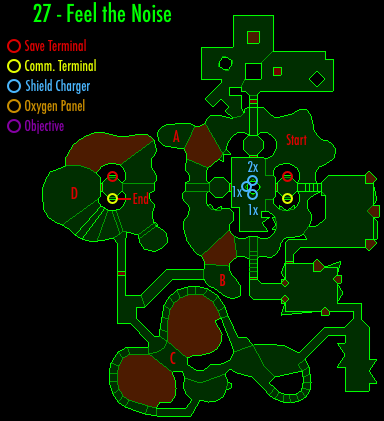
27 – Feel the Noise The name. The Story page likens it to PiD’s Feel the Power. I feel that both would even better fit the name Feel the Pain. Or Feel the Burn, especially with the lava around the place in this case. Then there are the song references, with their spelling issues … and the final statement about its describing the last room of the level – I would agree, but there are things we can do to make that room easier…. Last time on Tour of Duty (it may seem like just a few hours ago, but remember you spent the trip back to the planet in stasis ;)) we met Durandal. And there was much rejoicing. We explored a water-based facility not unlike Waterloo Waterpark, killed a lot of sims, and found some frustrating water level control systems. At the end, Durandal gave us a final message from Blake, and said there were still Pfhor down on Lh’owon, so here we are to kill them. We land to silence. But if we move much that all comes to an end. The start encounters here are among the toughest around, and we have to go such a long way to secure a pattern buffer and recharger! Hell for the scratchstarter. Personally I like to start with the 2x health from Fatum and at least one rocket for my SPNKR, in order to speed things up a bit. The start area is a large loop around a large central structure, with stairs leading up to a door that takes us away from this place. There are plenty of Hunters and Cyborgs around the place just waiting for us to take a step, and not nearly enough S’pht’Kr to make a difference. There is quite a bit of ammo, and one each of a 1x, 2x and 3x recharge canister sitting about. And there’s some ankle-deep lava for good measure. From our starting point we can also see a S’pht’Kr that has already landed, lying in wait on a high platform through a window. One shot wakes him up – there’s a bunch of them up there that tend to be pretty lazy! There are several alcoves around the central structure, and we can get to one of them without waking anyone up. And it just so happens to offer us a perfect spot from which to hurl ourselves up onto the top of that structure with a rocket to the face. With only 2x health it can be a bit dangerous, but a few shots upwards will wake up the Cyborg and Hunter up there, and they seem to head out of that immediate area. The first thing we see is a pillar with a switch on it, and on the other faces, two 1x and one 2x recharger, for some reason. And if we’re lucky, we get to recharge before the Cyborg and Hunter find us. There are two doors leading off from here, but where is here? Oh yes, the map!
Here is clearly where all those blue circles are! The door to the east leads to a pattern buffer and terminal, and that completes our insurance policy so let’s head there first. The difference between securing the pattern buffer now and how we would have to do it without a SPNKR must be around 1,000 words – I’ll report back. The terminal has Durandal clearing a few things up, while also doing the usual fair bit of bragging.
Interesting is the bit about Thoth – a) that (knowledge of) Durandal’s still being alive might have made him less helpful; and b) that he’s trying to help the Pfhor now. That whole balance thing really is two-sided! Profound, I know, but someone had to say it. And Durandal never does get a chance to explain that further :(. Presumably Thoth’s aiding the Pfhor would be in the form of telling them to get the hell off the planet, like he apparently told us to clear that ship for Blake’s men … perhaps balance is just about killing both sides in order to save both sides. But if that’s how it is, are there even any ships left for the Pfhor to get away on? Equally, that idea of balance fits with the nobody wins kind of ending to the final level of the game. Anyway, from here we can leap across to the room from which we would otherwise have accessed this area – a seemingly empty room. Lava pools line the outside, each with a jutting out wall over it not far off ground level – so we can’t fall into them. As we move through the room to what looks like a way out, we realise the room isn’t so empty after all – the ambush is just set for where we should have entered the room – through a door that is currently locked, and locked from both sides with no switch in sight, at that! And so, after dealing with the Hunters and Cyborgs, we head back. There is a switch to raise the stairs that allow us to get back up to the pattern buffer, but there’s now no two ways about it: it’s time to clear the starting area. We can get a few pockets of Pfhor to teleport in by jumping -just- off the edges in some places, but we’ll be doing most of it in the field. Running around madly is not necessarily the best option, better to spawn the Pfhor in smaller groups. When all is said and done, we also have the option of using the bigger health canisters to head up top again – with a SPNKR in hand this is really just an advance and save level, with a difference :). After that, though, we’re heading up those stairs. The door leads us to a room with Hunters already standing in wait beside more of those covered lava pools around the outside. This time there are some nearby that act as some sort of cover – but as we soon find out, not the most reliable sort. As we head further into the room a few S’pht’Kr arrive, but most of this is up to us, and it is mean, especially under normal circumstances. The door also closes really quickly, so it isn’t much use as cover either, and we can’t just wait outside, as the Hunters seemingly won’t come past those close lava pools. In fact, if we run away, some of them will head further in, to reinforce the following rooms! It can be best to spawn the S’pht’Kr and leave them to it though, as if we manage to hit them and piss them off, it is very painful. Also of note, and which I forgot to mention earlier, or maybe just wasn’t in the room with living ones long enough, and/or was used to seeing them along with sims on Fatum … whatever … the S’pht’Kr appear as hostiles on our radar. Normally in the next room the S’pht’Kr fare better, and alcoves around the room provide us a bit more ammo. Then along the next corridor we come to the bottom of a stairwell to the left, and find that the upper level is also open straight ahead, so more things can shoot at us! There are homing version Cyborgs about, because things were a bit too easy, and most of these guys survive the S’pht’Kr. If we left some of the health canisters in the start area, now might be a good time to make use of them – and again, there is a chance we could do another SPNKR save trick. Heading back in, we go on up the staircase and check for remaining Cyborgs. If it doesn’t look like there are any, just see what happens as you continue down the passage! That’s right, two more teleport in behind you, and this when you’re about to come under fire from Hunters to the front! Mean, I tell you, we still wouldn’t have access to a recharger normally. I can see N&BS are going to love this! When we’ve recovered from the shock of that ambush, there are indeed Hunters up ahead. There are two large lava pools with a central walkway that ends in a high platform, and stairs leading up from that level around to the right, and up from the lava level around to the left. One or two Hunters come from the right side and so can drop off and make it to us now, while more patrol the left staircase and generally make a pain of themselves. We are almost there. In fact, we can see the switch we need to hit, just over the lip of the higher level if we turn around – so a well-aimed grenade can hit it from here, but we wouldn’t have one of those either if we were scratchstarting; we’d be taking the stairs. Unfortunately, as soon as we set foot on them, more Cyborgs and Hunters teleport in at different levels, along with a few S’pht’Kr. Honestly, these ambushes are a bit much. At least these guys we can kill from a distance if we retreat. Ultimately, up the stairs we get direct access to the switch, and that officially opens up access to the central structure at the start of the level, and our insurance policy. And that, ladies and gentlemen, was … 999 words since I wrote “must be around 1,000 words – I’ll report back.” As a friend skyped to me earlier today, “I’m speechless! But I can still type.” Even with the SPNKR save that is one hell of a series of encounters on TC, to the point that it took me half a dozen attempts even just now. Very few other levels do that. And we’re by no means finished. In fact next up is a bit of a puzzle. We might have noticed the raised area with the start of the stairs to the right, but it is not all that obvious a place, and it is not an obvious leap from where that switch is. But there it is. There is also another unfriendly ambush as we climb those stairs, Cyborgs in front and behind, and incredibly usefully with such enemies, a Tozt on the highest step! We eventually reach the platform above the walkway and carry on towards the end of the level, except … the door is locked ><. Remember that second door leading out of the central structure at the start? Well we’re headed there now – conveniently there is a quick access tunnel back to the starting area from here, almost as if they knew! Actually it’s not the other door – the other door only goes to a small overlook for the ring around the centre. It’s the opening without a door. And the switch around from our rechargers raises a platform beyond that opening, leading towards a door to the north. As we head across the platform a Hunter spawns behind us – typical! The platform also goes back down – that’s why we didn’t come here earlier on. Beyond the door is a dropoff into a room with a lot of Hunters; yet again it’s difficult to dodge or get cover, and the door closes very quickly, and this time there are those lazy S’pht’Kr up top as well! And it’s not as if we can get up there to kick them into action, as standing on that lift in a room full of Hunters is suicidal. Conveniently we can coax some of them over towards us, shoot, and run away to recharge, and/or SPNKR them from the doorway, whatever works! Even when you think they’re mostly dead, there are bound to be more hiding behind the big square pillar in the back corner! When we can do it safely, we ascend to the top floor via the reasonably obvious lift polygon, run through the bunch of lazy S’pht’Kr shaking our head, and find the switch to open that door to the final room. Man it’s a shame there is no convenient access tunnel going the other way – it is a long hike to the final room. And with its being so very difficult, it could be many a long hike. However, as I said at the start of this, we can make it a bit easier. We find ourselves standing on the edge of a dropoff, and that’s usually bad news. Indeed, jumping in spawns all manner of nasty things! Conveniently, the edge of the platform is shaped such that we can run from the right in an arc that just touches one of the polygons of the area beyond, and cause one lot of Pfhor to spawn while we stay safe on the platform. We can then help the S’pht’Kr rain down death from above :). Once that lot is dealt with, we can shoot the switch lower down to our right. That lowers a platform on the left side, revealing lots of Hunters, including two blue MoaHs. Even they will eventually die to grenades lobbed down off the edge, and we stay reasonably safe – sometimes Hunter bolts will hit us as we do hit and run operations, and sometimes grenades will impact on the surface, or even in our face, but we get there, and the best part is we can go back to save and/or recharge at any point! When the Hunters are down it should be safe to jump in. This time around I found there was one homing version Cyborg left at the back – and he seemed to be enjoying a good dip in the lava. Around to the left, we find a door that leads to our salvation – a pattern buffer and the final terminal.
This clearly speaks to our being almost done here. A somewhat convenient story to bring the Juggernauts back into the mix, but I guess we’ll buy it. More S’pht are joining the rebellion – great, I guess those are the ones like we’ve been killing all game, the ones that were apparently going easy on us. It has been a while since we gave any thought to the rebellion. And with that quickfire session, it is time to hand back to PS for the final word as he follows the road to Sol – all roads. All timelines? We also forget for the most part about the concept that the Pfhor have been planning to take on Earth … at least this wild goose chase gained us something, at least in this timeline. But that’s another story, and shall be told another time.
| ||
|
| Replies: |
| Tour of Duty - Feel the Noise | Martin | 12/18/13 1:26 a.m. | |
| Re: Tour of Duty - Feel the Noise | VikingBoyBilly | 12/18/13 5:48 a.m. | |
| Re: Tour of Duty - Feel the Noise | Martin | 12/18/13 8:28 a.m. | |
| Re: Tour of Duty - Feel the Noise | PerseusSpartacus | 12/18/13 8:49 a.m. | |
| Re: Tour of Duty - Feel the Noise | VikingBoyBilly | 12/19/13 8:19 a.m. | |
| Re: Tour of Duty - Feel the Noise | Martin | 12/19/13 9:55 a.m. | |
| Re: Tour of Duty - Feel the Noise | Godot | 12/19/13 10:55 a.m. |
|
Problems? Suggestions? Comments? Email maintainer@bungie.org Marathon's Story Forum is maintained with WebBBS 5.12. |