/-/S'pht-Translator-Active/-/
|
|
/-/S'pht-Translator-Active/-/ |
| Tour of Duty - My Own Private Thermopylae | ||
| Posted By: PerseusSpartacus | Date: 12/9/13 8:25 p.m. | |
|
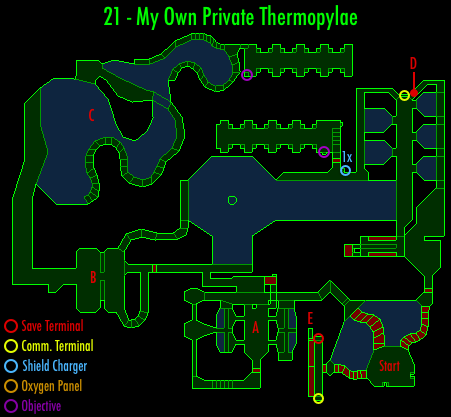
21 - My Own Private Thermopylae Previously on Tour of Duty, we were forced to eliminate a bunch of Pfhor Simulacrums inside the secret human base of operations, handled a group of Hunters, Troopers, and Sims inside a tiny, dark labyrinth of pillars just so we could get a few more clips of ammo, and were treated finally to a Shotgun and a crusher, both meant to cause harm to the Pfhor. We drop into a room with a big pool of water, three raised doors, three switches, and a 1x Shield Charger (when are we gonna get another 2x one, eh?). Hitting the switches raises three different windy staircases leading to the raised doors. Taking the left one, we come to a room with a Terminal, a Pattern Buffer, and two more switches. These switches will cause two platforms to start moving up and down. They seem to be moving at slightly different rates, as at one moment they will seem to come up and down together, and then a little while later, they'll look like they're moving opposite to one another. In a minute these will come in handy. For now, just save your game and hit the Terminal.
Despite the emphasis on the trapped humans, they really don't matter for our success - our goal is really just to activate all the computer cores in the area. This is easier said than done, considering the high presence of Troopers as well as a couple of Cyborgs in this region. If you're scratch-starting, this could pose a real problem. If you're playing from the previous levels, however, you'll have a Fusion Pistol and a Shotgun on top of your regular Magnum. This should make life a lot easier. On top of that, there's actually a secret weapon on this level. In fact, at this very moment in the level, it should actually be just above your position. Before we cover that, however, let's have a look at the map:
Presently, you are just south of point E on the map, with the Terminal and Pattern Buffer. What you have to do now is kind of tricky. First, you have to get the southern platform here to become stuck at its lowest position. This involves activating it and then stopping it the moment it reaches the lowest point. You'll see why this is important in a second. Next, leave the northern platform running, hop on it, and tap the northern wall with the action key. If you keep running forward, you'll run into a niche up high. Inside is a Rocket Launcher and (IIRC) some ammo for it. Now, run out of the niche as the platform is descending again, and you'll land on the southern platform, which is stuck in the lowest position. If the southern platform was still running, or was stuck at its highest position, you would continue to bounce up and down without end on the northern platform as your health is torn away bit by bit with a series of head-bumps into the ceiling. Now, recharge any health you may have lost (even with the southern platform open all the way, you can still bump your head at least once on the northern one) and save your game, because things may get a little messy. Heading up the middle staircase at the start, you'll find a long corridor, at the end of which are two Cyborgs who won't activate until you come a bit closer. As you do so, you'll find a Major Trooper to your left at one point (a little west of point E on the map), sitting on top of some narrow walkways holding back a bunch of water. Killing him isn't too hard, as you're a fair ways away from him; far enough to dodge his grenades, which are all he'll shoot at you. Just a little further along, you'll find the left side opens up to look over a big white room containing an Assault Rifle (point A on the map). You'll definitely want to jump down there, but remember that you do so at your own peril: a Cyborg or two (can't remember the exact number) and a bunch of Simulacrums will teleport into the air above this room, dropping down on you from on high. Given the weird way in which they fall, it's hard to judge how they'll fall - keep a close eye on the Motion Sensor and try to avoid any of the green blips from coming down directly on top of you. Once they've hit the ground, proceed to riddle them with bullets. Now, if you want to be thorough, you can head forward and through the door, which will lead to a staircase taking you back around to the corridor from earlier. This has the advantage of allowing you to deal with those two Cyborgs from earlier (along with one or two Troopers that I think also teleported in here when you dropped down) and gives you a chance to catch the Shield Charger before you continue (which you may be in desperate need of if a Sim caught you earlier). Drop back down and head through the north-east exit of this lower room. This will take you to a lift that leads up to a ledge with some ammo overlooking a large water pool. In the center of this pool is a pillar of water coming down from the ceiling, with all the water below being pulled towards the middle by the stream. It's an interesting spectacle, even if the water physics isn't necessarily realistic. Heading down this next corridor, we pop out above a group of BoBs fighting Troopers and Cyborgs at point B on the map. The BoBs have the advantage of range, allowing them to handle the Troopers with relative ease. Had the Troopers been closer, the BoBs would be dead within seconds. As it is, the Troopers can't really even hurt the BoBs that much, and their health is shredded by the massive volleys of pistol rounds. You hardly even have to do anything. Dropping down, there's a bit more ammo here, along with a small passageway leading to a ledge right next to the water pool from a moment ago, with (I think) some more ammo. Moving further along, you'll come to a large, open ledge overlooking point C on the map. Some Troopers teleport in below, but they're not too much of a problem - Grenades sort them out rather nicely. Now jump down to the stairway. Follow it around, and you'll come to another ledge with a terracotta BoB on it, who provides some nice fire support as some more Troopers teleport in on the next stairway. Dropping down again, you wind around to find another personality core much like the ones on This Side Toward Enemy, only with no water flooding it. Heading further along the stairs, you can drop back to the ledge with the terracotta BoB, who has a buddy who seems rather ineffectual; he's simply facing in the wrong direction to care about the Troopers. At least he's got some more ammo next to him. At this point, you're probably thinking this is a rather ammo-friendly level - not only did you get a Rocket Launcher, but you grabbed all kinds of ammo for your other weapons, especially the Magnum and your newly-found Assault Rifle. The rest of the level I think is less this way, however, so your good luck kind of just ended. Jumping back down to the first ledge of the C area, you run past all the BoBs and return to the start of the level. It's a good idea to recharge and save here, because there's a number more enemies remaining, and you're not fighting on favorable terms any more. Heading up the right stairway, you head north. Fairly quickly you'll run into some Cyborgs and Troopers. These ones are now at a close enough range that you'll really want to dispose of them fast. If you're playing conservatively, you may want to run back to the starting room and try to convince them to come single-file down the stairs to meet you - the terms of combat would probably be more to your liking there. The map here can potentially be a bit confusing, but at this stage there's only two places to go - east and north. It may be worth while to go north, if only to find a lonely little green BoB at the end of a corridor. I generally punch him and steal his ammo, but if you're more loyal to the humans around you, feel free to leave him alone - he never does much of anything, and you don't honestly need the ammo at all. Heading east, you'll find some big platforms moving up and down from the ceiling. I'm not sure, but I think they can crush you, so stay out from underneath them. Heading between them, you'll find a lift to the upstairs, which likewise contains platforms going up and down, this time from the floor. This kind of creates the illusion of there being large mechanical... things... sliding through the floor of the upstairs into the downstairs. Heading a bit forwards, you'll come to a big hallway with some more baddies. At the very end of it, there's something rather interesting. Tapping the wall will reveal a secret terminal:
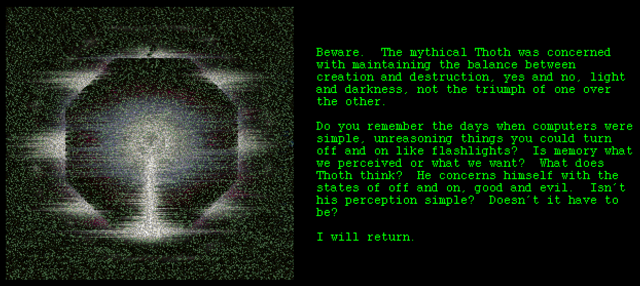
What? Hello? Wait, don't go! Who are you? What are you? Please stay - I'm lonely! Wait... Green text; a fuzzy Durandal symbol; talk of return... It can't be... P.S. If things around here aren't working, it's because I'm laughing so hard. But how? How could he still be alive? This is something that we can't really understand at this point; the only information we have suggests that he's somehow still alive. In the meantime, we can take account of what he's saying. Remember that back on the last level I said Thoth's role in the Egyptian underworld was to report when the scales weighing the virtue of the deceased are even? Well it looks like Bungie seized on this little tid-bit, as the AI Thoth is obsessed with balance. He does not care for the triumph of one side over another. Perfect continuous balance is the way he likes things. Why this is, it's unclear. Durandal here is hinting we should be wary of this behavior. Why? If we do too well, for instance, he might decide to work with the Pfhor to slow us down - he'll only be of any help when we're on the losing end of things. Now what might this mean in light of the fact that he's supposed to be the one who contacts the S'pht K'r for us? You shall have to wait and see. Moving a little further on, we come around a few water pools to find another 1x Shield Charger, a door, and a switch to open it. Through this door is the second personality core, which I believe may be guarded by a few enemies, but I can't be sure. With all that settled, we may now return to the first terminal:
People have pointed out that here he says there's only one more activation site, when on the very next level he admits there are in fact two. I think this may have been a minor error on Bungie's part. The phrase 'activation site' could easily be taken one of two ways: 1, as a location containing at least one if not more personality cores; or 2, as an individual personality core. Given that there are two personality cores on the next level, one can assume that on that level, Blake was using the phrase 'activation site' to refer to an individual personality core, though on this level, he uses the phrase to refer to the general location where these personality cores can be found. This was probably just a minor slip-up by Bungie. In any case, slip-up or no slip-up, this may be the last time I do an M2 level until Martin works his way to All Roads Lead To Sol, at which point I'll return to do that final level before he moves on to take charge of the Infinity write-ups and I move on to do god-knows-what. So for now, au revoir! Vale,
| ||
|
| Replies: |
| Tour of Duty - My Own Private Thermopylae | PerseusSpartacus | 12/9/13 8:25 p.m. | |
| Re: Tour of Duty - My Own Private Thermopylae | Martin | 12/10/13 9:16 a.m. |
|
Problems? Suggestions? Comments? Email maintainer@bungie.org Marathon's Story Forum is maintained with WebBBS 5.12. |